The store will not work correctly when cookies are disabled.
Cookie Preferences
We use cookies and similar technologies to enhance your experience and ensure smooth order processing and to improve our website by analysing visitor behaviour or personalise content and show relevant offers.
Essential cookies are required for the site to function and cannot be disabled. By clicking "Accept" you agree to all cookies, including analytics and marketing. To decline non-essential cookies, click "Decline".
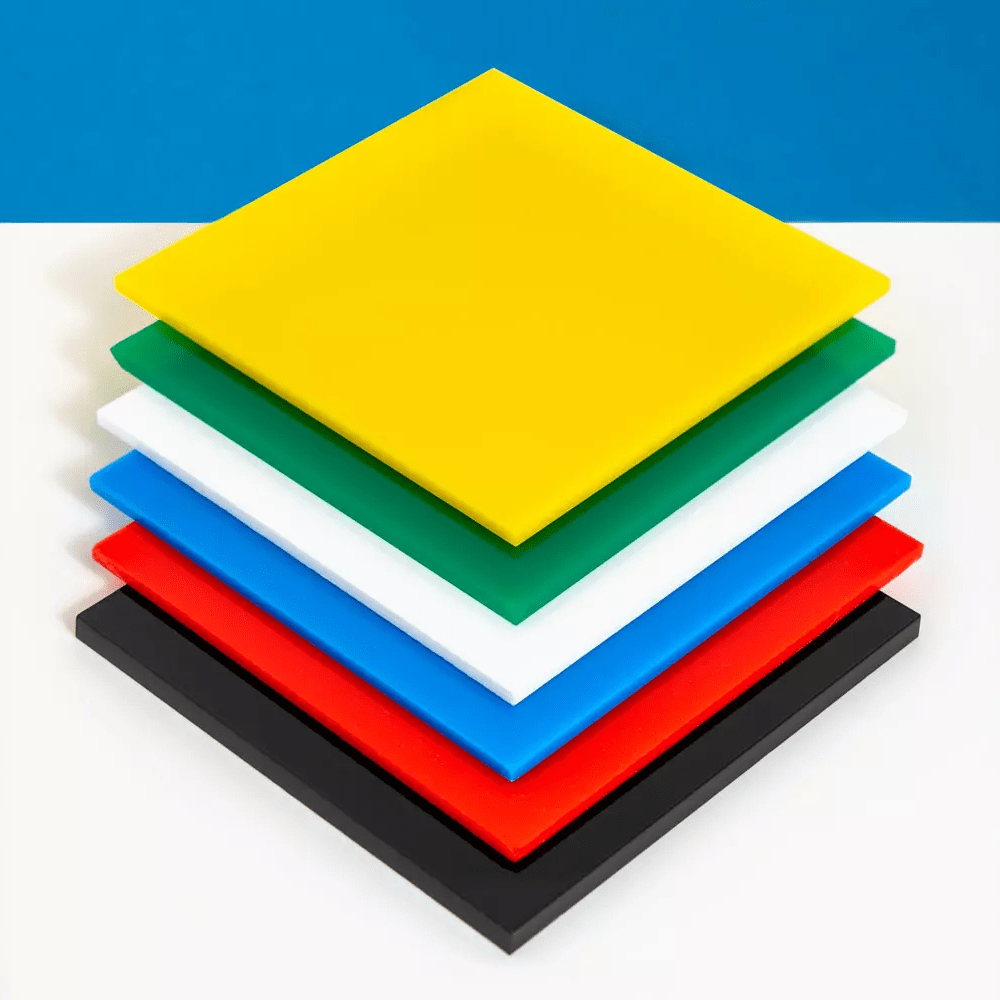
Acrylic sheets, often known by the brand name Perspex in the UK, are versatile materials used in various applications, from DIY projects to professional fabrication. Whether creating a custom display case, modifying a piece of furniture, or working on an art installation, knowing how to drill acrylic properly is essential. This guide will walk you through the process, ensuring you achieve clean, precise holes without damaging your acrylic sheet.
Preparation: Tools and Safety First
Before you begin, gather the necessary tools. You'll need:
A drill (preferably variable speed)
Sharp drill bits suitable for acrylic
Masking tape
A marker or pencil
Scrap wood for backing
Safety goggles and gloves
A workbench or stable surface
Safety should always be your top priority. Acrylic can chip or crack if not handled properly, so wearing safety goggles is crucial to protect your eyes from potential debris. Gloves will help prevent cuts from sharp edges.
Choosing the Right Drill Bit
The success of your project largely depends on using the correct drill bit. For acrylic, you have several options:
Specially designed acrylic drill bits: These have a unique point angle that reduces the risk of cracking.
Brad point bits: Excellent for precise positioning and clean entry.
Standard twist bits: Can be used but require more care to prevent chipping.
Ensure your chosen bit is sharp. A dull bit is more likely to cause cracking and produces a less clean hole.
Setting Up Your Workspace
Proper setup is crucial for successful drilling. Follow these steps:
Secure your acrylic sheet to a stable surface, preferably a workbench.
Place a piece of scrap wood underneath the acrylic. This provides support and helps prevent chipping on the exit side of the hole.
If drilling multiple holes, consider clamping a straight edge guide to ensure accuracy.
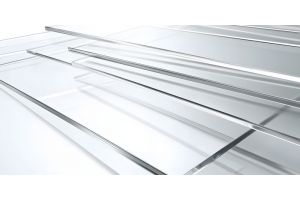
The Drilling Process
Now that you're set up, it's time to drill. Here's a step-by-step guide:
Mark your drill spot: Use a marker or pencil to precisely indicate where you want to drill. For added precision, apply a small piece of masking tape over the spot and mark on that. The tape also helps prevent the drill bit from slipping.
Start with a pilot hole: Begin with a smaller drill bit to create a pilot hole. This helps guide the larger bit and reduces the risk of cracking.
Drill slowly: Set your drill to a low speed. Acrylic can melt if the drill bit gets too hot, so a slower speed helps prevent this.
Apply steady, gentle pressure: Let the drill do the work. Applying too much pressure can cause the acrylic to crack.
Cool as you go: If you're drilling thicker acrylic or multiple holes, periodically dip the drill bit in water to cool it down. You can also use a spray bottle to mist the drilling area, which helps prevent melting and clears away debris.
Drill from both sides for thick sheets: If you're working with thicker acrylic (over 10mm), consider drilling halfway through from one side, then completing the hole from the other side. This technique helps prevent chipping on the exit side.
Common Issues and Solutions
Even with careful preparation, you might encounter some issues. Here's how to address them:
Cracking: If you notice small cracks forming, stop drilling immediately. You may need to start over with a sharper bit or slower speed.
Chipping: To minimize chipping, ensure you're using a backing board and consider applying masking tape to both sides of the acrylic.
Melting: If the acrylic starts to melt, stop drilling and allow it to cool. Clean the bit and resume at a lower speed, using water to cool the area.
Finishing Touches
Once you've successfully drilled your hole, there are a few final steps:
Smooth the edges: Use fine-grit sandpaper to gently smooth any rough edges around the hole.
Clean up: Remove any debris or dust from the acrylic surface and your work area.
Polish (optional): For a professional finish, you can use acrylic polish to restore shine to the area around the drilled hole.
Drilling acrylic sheets might seem daunting at first, but with the right tools, preparation, and technique, it's a skill that anyone can master. Remember, the key is to work slowly and patiently. Don't rush the process, and always prioritise safety.
As you gain experience, you'll develop a feel for the material and become more confident in your abilities. Whether you're working on a small home project or a large-scale professional job, these techniques will help you achieve clean, precise holes in your acrylic sheets.
Really excellent service from CutMy, easy to use website, shelf arrived promptly in the post & fitted my bathroom cabinet perfectly. Very pleased customer :)
Melinda Ashton,
21 hours ago
Verified
Easy to use ordering on website
Easy to use ordering on website. Quick delivery and arrived as ordered.
Mark Cox,
23 hours ago
Verified
Excellent product and excellent…
Excellent product and excellent service. I would definitely recommend and use again if needed.
Mrs Melanie Derges,
1 day ago
Verified
Good price
Good price
Delivered on time
Good quality
Mr Dawson,
1 day ago
Verified
Good information
Good product, company kept me informed of order process throughout
JB,
2 days ago
Verified
Easy ordering system and delivery very…
Easy ordering system and delivery very quickly. The item was well packaged. Would definitely recommend.
Claire O,
2 days ago
Verified
Nice easy web site
Nice easy web site, good communication and delivery, will definitely use them again
Andrew Safford,
2 days ago
Verified
The items were cut to exact size…
The items were cut to exact size required. They were packaged very carefully and I was amazed how fast delivery was. I can recommend this company and products.
NICHOLAS,
2 days ago
Verified
Friendly staff and helpful too.
Friendly staff and helpful too.
We ordered some Perspex and picked it up a week later.
It was exactly what we wanted for the greenhouse.
No problems at all.
Many thanks
Angela,
2 days ago
Verified
Fast delivery
Fast delivery . Item well protected during transit
Reviewer,
2 days ago
Verified
Great quality
Great quality. Strong protective packaging. Quick delivery.
Alex,
2 days ago
Verified
Provided ,quickly my request
Provided ,quickly my request
Mr Michael Cusden,
2 days ago
Verified
I ordered triangular pieces when they…
I ordered triangular pieces when they came they were rectangular. The company rectified the problem within any hassle.
Norman TAYLOR,
2 days ago
Verified
Fitted perfect in the frame
Fitted perfect in the frame
Christopher,
2 days ago
Verified
Great product, just delayed
Product was great and well cut. Great materials and good quality. Good communication from company too. Slightly confusing when initially unpacking, with two orders for different rooms mixed across packaging. Order did arrive 24 hours late which made planning more difficult.
Richard Walker,
2 days ago
Verified
Excellent service
Excellent service
David,
2 days ago
Verified
Great product prompt delivery .
Great product prompt delivery .
Nuala Holden,
2 days ago
Verified
Simple straightforward and effortless.
Simple straightforward and effortless.
Jonathan Greensted,
3 days ago
Verified
Cut My did well and was prompt in…
Cut My did well and was prompt in producing what I wanted but the delivery service let it down because it took some days before it came.
Janet Robins,
3 days ago
Verified
Provided exactly what I needed
Provided exactly what I needed, delivered on time, and on budget.
Their ordering process was simple and seamless to use with no faff or fumble and no need for telephone tennis with customer service.
I have a couple of other projects that I will definitely use them for in the near future.
customer,
3 days ago
Verified
Exactly what I ordered
Exactly what I ordered, delivery prompt
James Peterson,
3 days ago
Verified
Highly recommend
Highly recommend, there was a slight problem but quickly rectified with no fuss. Perfect
Laura Hughes-Roberts,
3 days ago
Verified
Perfect Order
The wood was cut to my exact specifications and fitted perfectly first time, with no adjustments needed.
The ordering process was simple and straightforward, and delivery was quick.
The only slight downside was that the shipping cost was a little higher than I had expected.
Overall, I'm very happy with the product and would happily recommend it.
Richard Staite,
3 days ago
Verified
The acrylic was cut exactly as ordered
The acrylic was cut exactly as ordered, fits my window properly and allows the air conditioner to vent outside. Happy with the piurchase!
C R J Lauber,
3 days ago
Verified
A very fast & efficient service.
A very fast & efficient service.
Paul Summerfield,
3 days ago
Verified
Great service
Great service, the glass affect is truly amazing, everyone who sees it can't believe its perspex will definitely use this company again
edward obrien,
3 days ago
Verified
Easy process
Easy process and products arrived as advertised and required.
D R,
3 days ago
Verified
All round good experience
Easy to order, delivered on time, quality product and service. Thank you.
Nigel Hillyard,
3 days ago
Verified
The plywood was cut exactly to length…
The plywood was cut exactly to length and fitted perfectly. The wood was good quality aswell.
Trevor Glendinning,
3 days ago
Verified
Delivery was as stated and item cut…
Delivery was as stated and item cut perfect for my needs at very competitive price. Very satisfied
Linda and thanks for your order,
3 days ago
Verified
Always excellent
I've used CMP several times before and always the products and results are first rate. Highly recommended!
Mark Jones,
3 days ago
Verified
Wooden slips - perfect
Needed some wooden slips to cover an uneven gap between a post and the wall. Items were cut to size, in a trapezium shape and fit perfectly
M Warren,
3 days ago
Verified
Good product well machined and…
Good product well machined and protected. Good delivery, good price.
Tavis,
3 days ago
order exactly as requested
Just received my order exactly as requested. Incredibly well packed. I will be using Cut My again!!!
Chris,
3 days ago
Verified
Really pleased with my coated glass for…
Really pleased with my coated glass for my bedside shelves, looks really sleek and fits perfectly. The only downfall was the length of time from ordering to receiving my goods, so if you are on a time scale order we'll in advance
Susan Gastall,
3 days ago
Verified
great service
great service
customer,
3 days ago
Verified
Great
Easy to deal with, and received what I had ordered on Schedule
Bernard TASSI,
4 days ago
Verified
Order exactly as requested
Order exactly as requested. Good communication & efficient pickup.
Susan,
4 days ago
Verified
The splashbacks look superb and were…
The splashbacks look superb and were cut exactly to my measurements. The delivery was so well packaged and protected against breakage.
John ,
4 days ago
Verified
Everything very good
Everything very good. Ordering, delivery and product.
Peter Knox,
4 days ago
Verified
Delivered what I ordered on time
Delivered what I ordered on time
Frances Hinton,
4 days ago
Verified
Really pleasant experience buying from…
Really pleasant experience buying from Cut My. Website clear and I had my sheet of Perspex to allow for air con. exhaust tube cut to my specification in a matter of days. I also had some contact from Megan in customer service and she was very helpful. I would certainly use them again and have recommended them to a number of friends needing similar jobs done.
Sean Connochie,
4 days ago
Verified
Fantastic ultra quick service ????
Fantastic ultra quick service ????
kenneth,
4 days ago
Verified
Highly recommended
Only wanted a small piece of clear acrylic but can’t fault the quality and service. Delivery was super fast and the item wrapped very well! Great!
Catherine,
4 days ago
Verified
It did exactly what it said on the tin
It did exactly what it said on the tin
Excellent service
customer,
4 days ago
Verified
This is a good tool which had a piece…
This is a good tool which had a piece of glass enclosed which could be used to practise with. competitively priced and arrived quickly.
customer,
4 days ago
Verified
Everything was good
Everything was good
Gary Neale,
4 days ago
Verified
prompt
prompt, much needed and affordable
Lucy,
4 days ago
Verified
Perfect
Great company to buy from. Very reasonable prices, perfect sizes and really quick delivery. Highly recommend.
Pam Smith,
4 days ago
Verified
Good price great product even better…
Good price great product even better installation guide. I would definitely use this Company again for my next project. Superb.
bob mcdougall,
4 days ago
Verified
All ok
All ok, everything fitted fine and was good quality
michael Artes,
4 days ago
Verified
Air conditioner acrylic window seal
The acrylic window seal (with a hole cut for the air conditioner) was exactly as described and made an incredible difference to the room temperature during the recent hot weather. The service was excellent and I can highly recommend this company
J.Clark,
4 days ago
Verified
Great Service and easy to use Web site
Great Service and easy to use Web site. The MFC board parts I ordered were spot on. It was a fairly big project (a media wall) but the CutMy service made the job a lot easier and the end product is superb.
Robert Neville,
4 days ago
Verified
Excellent service pieces of clear…
Excellent service pieces of clear plastic cut to size to put in granddaughter's club house. Faultless service, fully recommend.
Helen,
4 days ago
Excellent company to deal with
Excellent company to deal with, product very good quality and staff very helpful
Mr/Mrs Rodger,
4 days ago
Verified
Good product cut correctly
Good product cut correctly
Nicki Harrison,
5 days ago
Verified
Great service
Very helpful service, they even realised I had made a mistake in my measurements and contacted me to get them corrected before sending out the order.
Sean Day,
5 days ago
Verified
It all looks very good
It all looks very good, neatly cut and packaged. A little mix up regarding scale was cleared up and resent; you can see a firm's commitment to sort it when something isn't quite right.
Richard J Counter,
5 days ago
Verified
Very happy with my order
Very happy with my order, a piece of acrylic with vent hose hole for my aircon the Velcro tape was easy to apply & it stayed put no problem
Julie Sansome,
5 days ago
Verified
Shelving
My order was for 9mm marine ply cut to replace flimsy shelves in my garage. They were delivered quickly and fitted perfectly. I'll be using them again. Highly recommend them to anyone
Richard Upton,
5 days ago
Verified
Excellent service
Excellent service
Archie Maidment,
5 days ago
Verified
Great experience …
A very simple ordering process and clear instructions to prevent errors on behalf of the buyer. Reasonable process and good follow up communication. Would definitely use again.
Gill Holloway,
5 days ago
Verified
Very impressed with this Company
I am so impressed with this Company, the website was clear and easy to navigate, the ordering process was simple. The product arrived promptly and very well packaged so all safely delivered in perfect condition. I will be using them again and am happy to recommend them :)
Teddington Liz,
5 days ago
Verified
Very good from start to finish
Very good from start to finish. Easy ordering process. Excellent delivery service it was very fast. Definitely recommend
Jane Chestney,
5 days ago
Verified
The wood ordered was exactly what was…
The wood ordered was exactly what was required and was delivered in time and undamaged.
Mr C Burden,
5 days ago
Verified
Excellent service
Excellent service
Desmond Cathey,
5 days ago
Verified
Great products at a reasonable price
Great products at a reasonable price. They were perfect for my bedroom furniture.
Julia Groves,
5 days ago
Verified
Perfect seal for air conditioning
I needed some polycarbonate cut to size with specific openings for our AC. Cut My was the simplest website to use, as well as the most cost effective offer overall. I am very pleased with the results. The sheet was cut, packaged very securely, and delivered quickly.
Graham Lenton,
5 days ago
Verified
good product
good product
Customer,
5 days ago
Verified
Unable to fault the experience
Delivered exactly what was requested, in good time. Faultless.
Keith Griffiths,
5 days ago
Verified
Quality and cut was spot on
Quality and cut was spot on. Nice clean wood. No nots or blemishes. Would highly recommend you
Steve Couch,
5 days ago
Verified
First time customer.
First time using CutMy and my customer experience was excellent. I had just purchased an air conditioner and was seeking a simple and effective solution to vent the hot air from the machine out the window. CutMy offered that solution which was better and cheaper than what was offered, as an extra, by the aircon manufacturer.
Ordering was super easy and delivery very quick. The perspex window cover with vent hole, positioned to my requirements, was simple to fit and works perfectly. Great service start to finish. Thanks to all involved.
Brian Connelly,
5 days ago
Verified
Fantastic service
Fantastic service
Looked after us yet again. Will definitely be using you again.
Matthew,
5 days ago
Verified
VERY GOOD CUSTOMER RELATIONS CUT TO…
VERY GOOD CUSTOMER RELATIONS CUT TO SIZE FIRST CLASS PEOPLE THANKS FOR YOUR HELP
Fast and efficient service .
Well packaged , no damage fast delivery.
Excellent service would use them again
customer,
5 days ago
Verified
Really great quality small coffee…
Really great quality small coffee station worktop ordered, arrived quickly and packaged really well.
Tom,
5 days ago
Verified
Great product
Great product, extremely pleased.
Mrs Hobson,
5 days ago
Verified
I will return if more required as I was…
I will return if more required as I was 100% satisfied first time.
MR D A CRAVEN,
6 days ago
Verified
Brilliant customer service …
Fpund their website really easy to use and navigate. Brilliant customer service delivered next day. Would definitely order again.
Kirsty townsend,
6 days ago
Verified
Garden tabletops
Arrived well packaged and an exact fit … very pleased !
Christine Piercey,
6 days ago
Verified
Great packaging to ensure safe…
Great packaging to ensure safe delivery.
Easy to determine size and to order. Great when installed, does the job, very tidy (the wife couldn't see it when in place-so quite a surprise)
Piers Myatt,
6 days ago
Verified
Great product and service
I needed shelving quickly and didn't have any options to get a decent cut finish myself, so I ordered from Cutmy. The shelves arrived on time and fitted like a glove. The finish was superb. So if I was in the same circumstances again, I would definitely use the firm again.
Alex Haddow,
6 days ago
Verified
Excellent service… quick delivery
Excellent service… quick delivery. Products are good quality and they deliver competitive pricing. Easy to use website and can cut to size. Very happy customer. Would definitely use again.
Former Flyer,
6 days ago
Verified
Great product, price and service
Product as ordered. Timely delivery. Helped me out when I mistakenly entered incorrect address. Would recommmend.
Matthew Alexander Klein,
6 days ago
Verified
Quality of product is good
Quality of product is good , timing and delivering was good as well , I just gave slightly wrong size which is on me , I’d suggest the company have more clear guidance or a video on actual example for people like me that they don't have enough knowledge of this product , I would recommend this business.
Ryan,
6 days ago
Verified
I used to replace the broken glass…
I used to replace the broken glass windows on our shed. Great item !
Emily,
6 days ago
Verified
Great bespoke product
Great bespoke product. Great comms
Jay,
6 days ago
Verified
Excellent
Super fast delivery, excellent service and product cut exactly to my measurements. Would definitely use again and will recommend 5/5
Chris Milne,
6 days ago
Verified
5 Star service
The company cut my order to size perfectly and it was sent to me within a few days.From start to finish it was seamless .Would use them again no problem
Mr John Ellis,
6 days ago
Verified
Excellent Quality and Precision Every Time
I’ve used Cut My for a couple of different projects now, including a custom acrylic table protector and acrylic panels for secondary glazing, and they’ve been excellent every time.
Everything has been cut exactly to the measurements I provided, the quality has been superb, and delivery has always been quick. Both orders arrived well packaged and ready to install, with no issues whatsoever.
It’s refreshing to find a company that consistently delivers exactly what you order. I wouldn’t hesitate to use Cut My again and would happily recommend them.
Mel,
6 days ago
Verified
Really great customer service
Really great customer service. Initially the product I ordered had an issue, so I spoke to customer service and they resolved the issue very quickly, with no fuss. I will definitely use CutMy again for future projects.
Radu Ciuca,
6 days ago
Verified
Very efficient
Very efficient, fast delivery, precise size as ordered. All much appreciated.
Michael,
6 days ago
Verified
Well packaged and arrived promptly
Well packaged and arrived promptly. Everything was spot on! Excellent service.
Kathryn,
6 days ago
Verified
easy to order and supplied quickly
easy to order and supplied quickly
Louise,
6 days ago
Verified
Perfect cut
Perfect cut
Delivered on time with great care
A very professional company
Great care with the packaging well protected
Lucy Bennett,
6 days ago
Verified
Great product
Great product, fast delivery and great communication
Caroline Gamester,
6 days ago
Verified
Quality of the product was very good
Quality of the product was very good. Only negative point was to “start “ the peel off film. The disc was cut to close tolerance.
J. Sikka,
6 days ago
Solution for casement aircon hose
Bought cut Perspex for aircon hose for casement window as other choices were inefficient - best solution ever! Very simple idea that I can easily transfer to other prepared frames the same size. Very happy with the quality, packaging and speed of delivery ! Thankyou so much
Jacqueline I,
6 days ago
Verified
Fast delivery and product was great and…
Fast delivery and product was great and very well packaged. May get more from them in the future
Bartosz Pietak,
1 week ago
Subscribe to our email newsletter
Sign up here for our occasional email newsletter with new products, design ideas and discounts across our huge and growing range of products. (You can unsubscribe at any time of course.)