The store will not work correctly when cookies are disabled.
Cookie Preferences
We use cookies and similar technologies to enhance your experience and ensure smooth order processing and to improve our website by analysing visitor behaviour or personalise content and show relevant offers.
Essential cookies are required for the site to function and cannot be disabled. By clicking "Accept" you agree to all cookies, including analytics and marketing. To decline non-essential cookies, click "Decline".
Tanya is a skilled digital marketing assistant and photographer with a passion for aesthetics. She offers insights and inspiration for DIY enthusiasts, empowering them to embark on their creative journeys with confidence.
How to Panel Multiple Walls in a Room: Complete Planning and Installation Guide
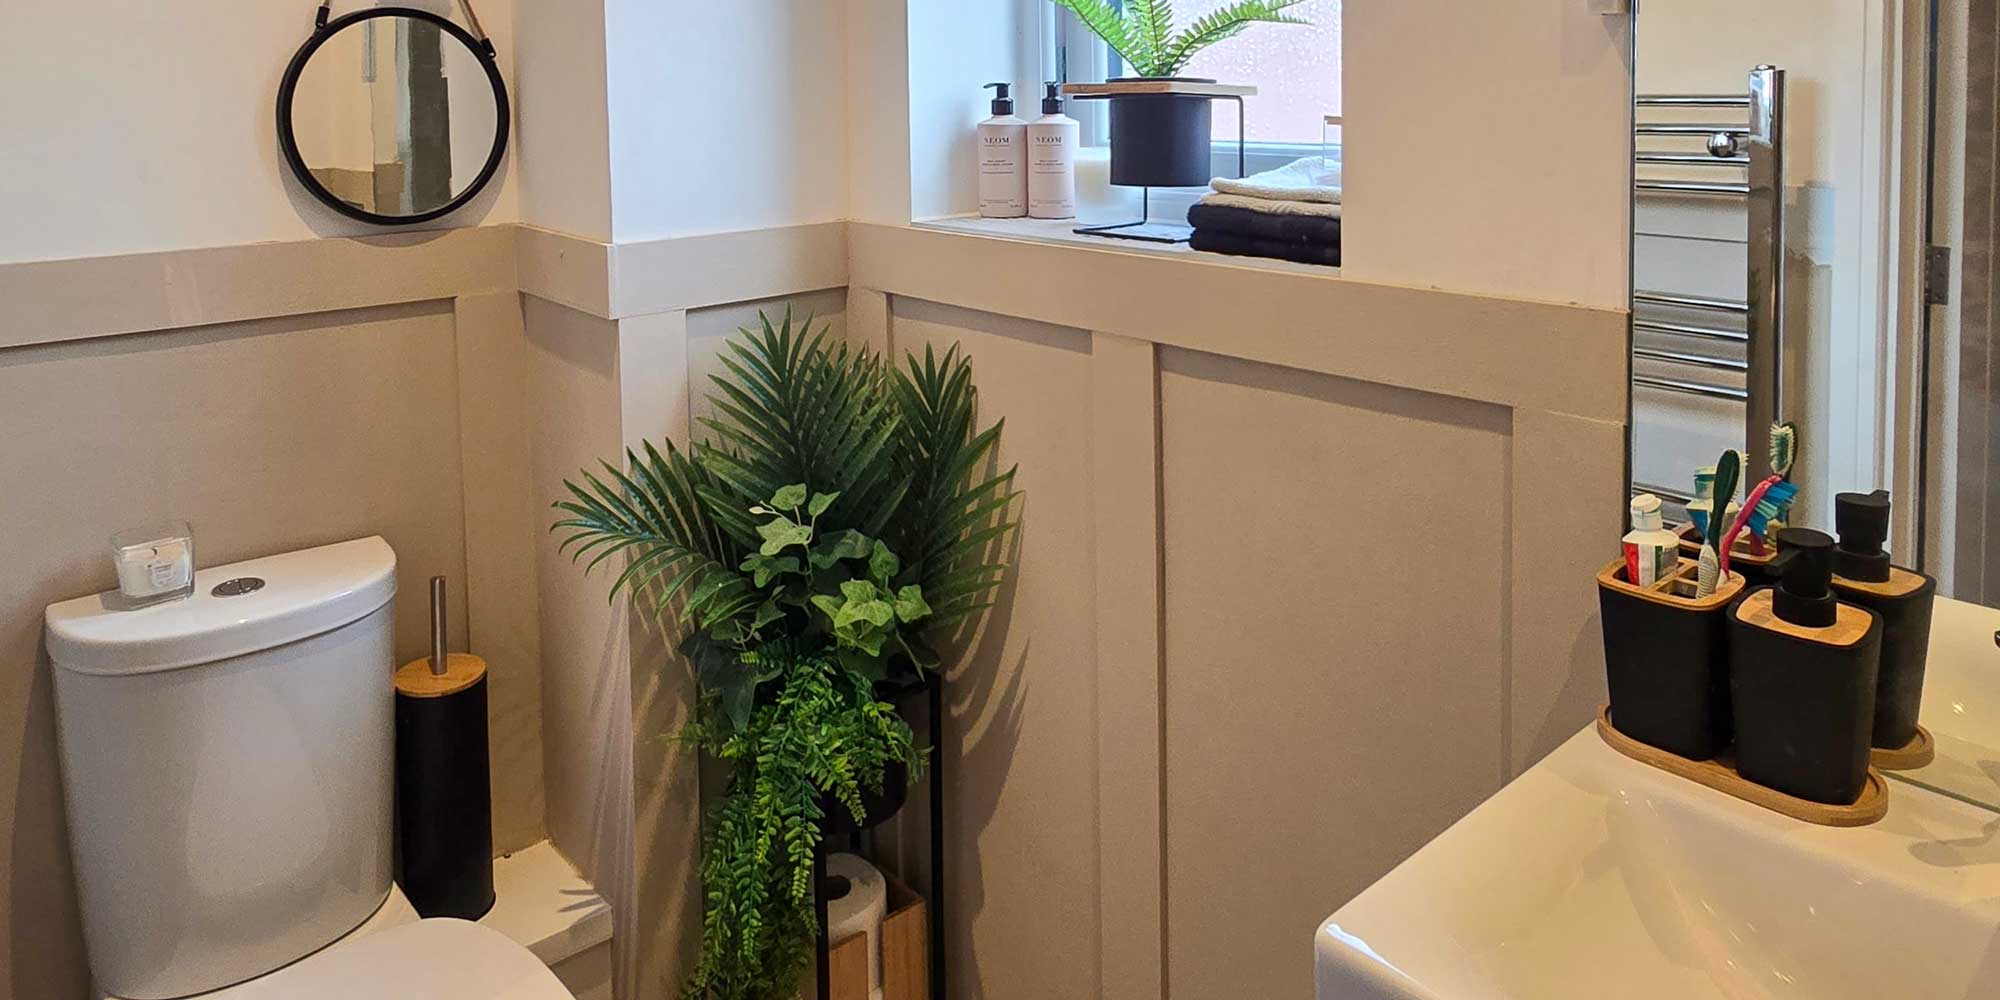
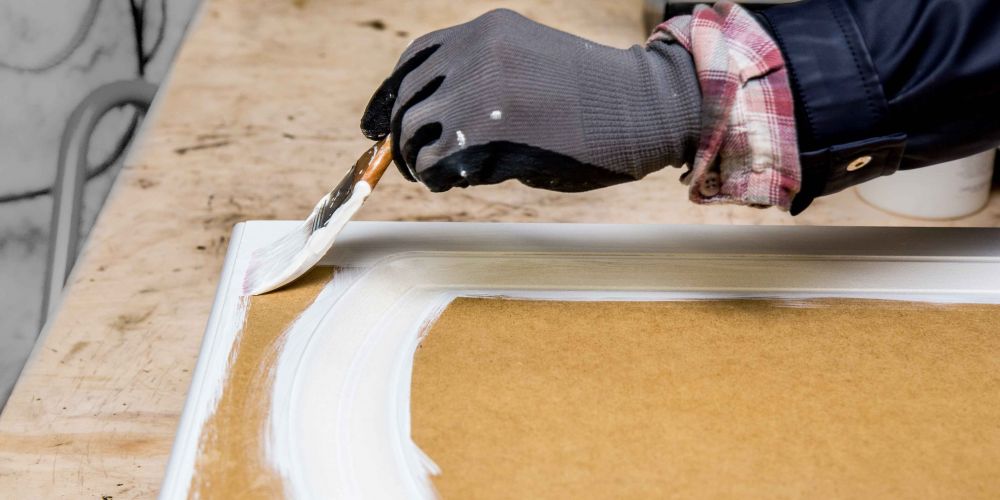
Panelling multiple walls in a room transforms an ordinary space into something truly special. Rather than the piecemeal look of single accent walls, multi-wall panelling creates a cohesive, luxury finish that adds significant value to your home. With multiple walls panelled, you can create striking visual effects like feature corners, wrap-around designs, or cohesive colour schemes that tie the entire space together. However, achieving that seamless, professional appearance requires careful planning, particularly around measurements, ordering, and ensuring consistent alignment where walls meet.
Here is a guide outlining key considerations to keep in mind before placing an order. It covers measuring, ordering, fitting, and managing dado rails.
Considerations Before You Start
The Two Main Approaches
Option 1: Individual Wall Kits - Order a separate kit for each wall. This is simpler to plan and install but may result in slightly different spacing between walls, creating minor visual discontinuities at corners or between column spacing.
For example: If one wall is 2400mm wide and another is 2200mm wide, shaker columns may not line up exactly across the corner, and both walls would have slightly different column spacing to each other.
Option 2: Combined Kit - Order one large kit sized for the total width of all walls combined. This ensures perfect spacing consistency but requires you to cut the panelling down for each wall and precise planning.
Option
Pros
Cons
1. Kit Per Wall
Simpler to order, pre-sized
Groove/batten spacing may not align across corners
2. Combined Total Kit
Consistent spacing across walls
Needs cutting down, more measuring up front
The choice between these approaches depends on your skill level, available time, and how critical perfect alignment is to your desired outcome.
Why Multi-Wall Panelling Needs Planning
Groove alignment or shaker spacing across adjoining walls
Wall thickness impact at corners
Ordering panels to fit either individual walls or full room dimensions
Measuring Your Room Correctly
Measure each wall from corner to corner
Account for skirting boards or dado rails already in place
Check both wall width and height for accuracy
Internal Corner Adjustments
Deduct panel thickness (e.g., 9–12mm) from adjoining walls when measuring. For example: If one wall has shaker panelling at 12mm thick, subtract that from the width of the adjoining wall.
External Corner Adjustments
Add batten thickness to walls wrapping around an external corner.
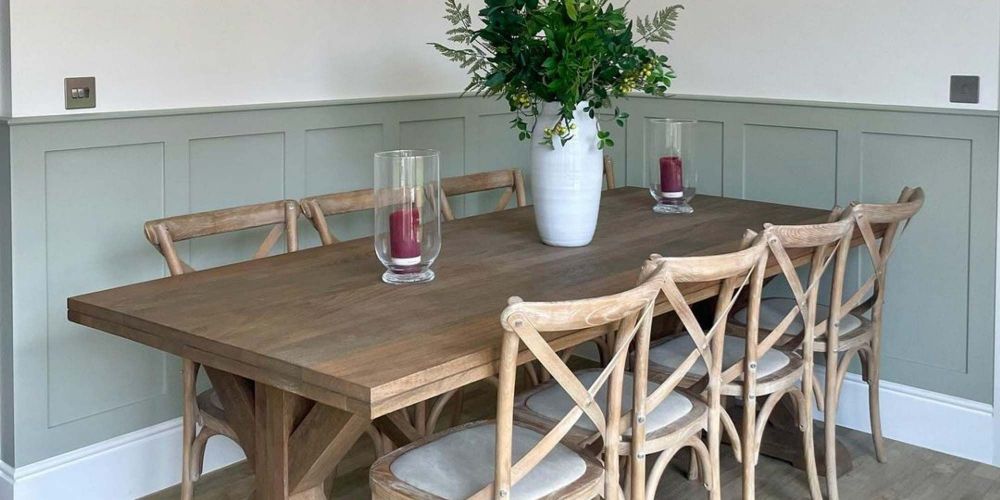
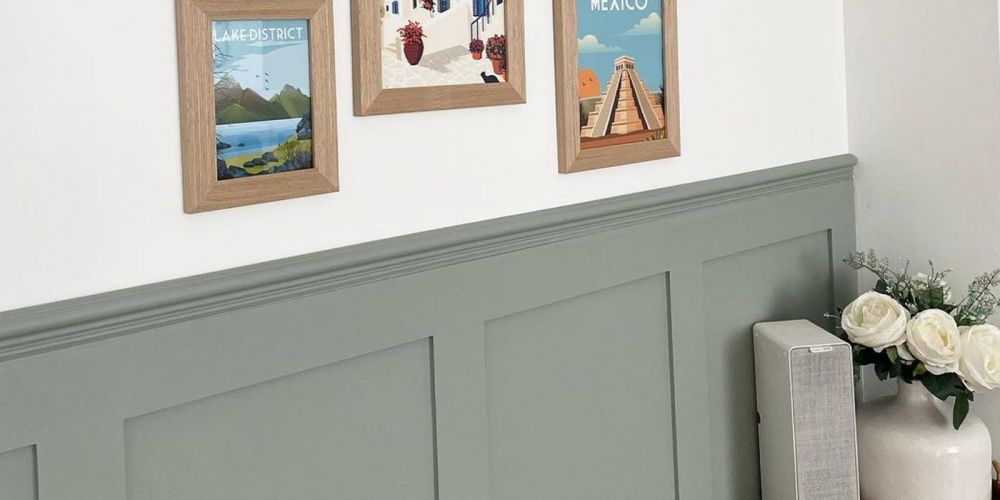
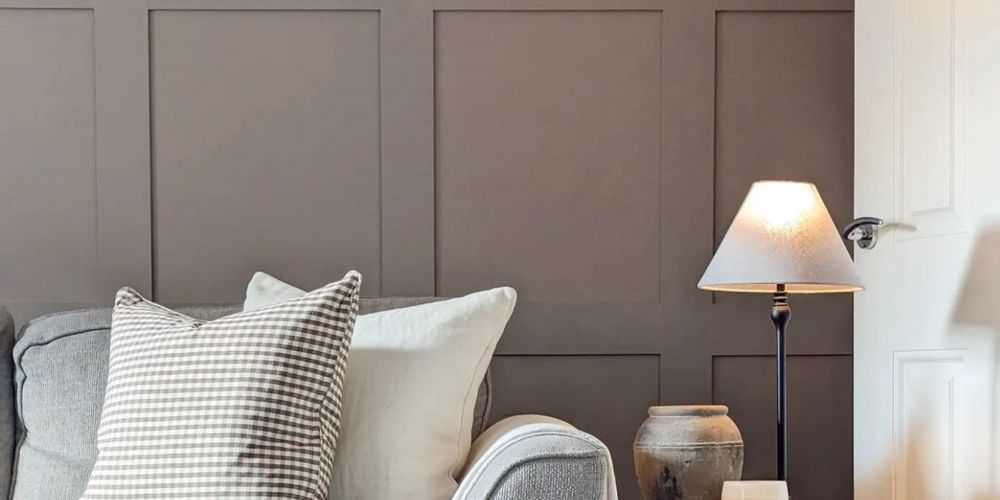
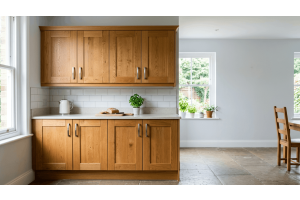
Shaker Panelling
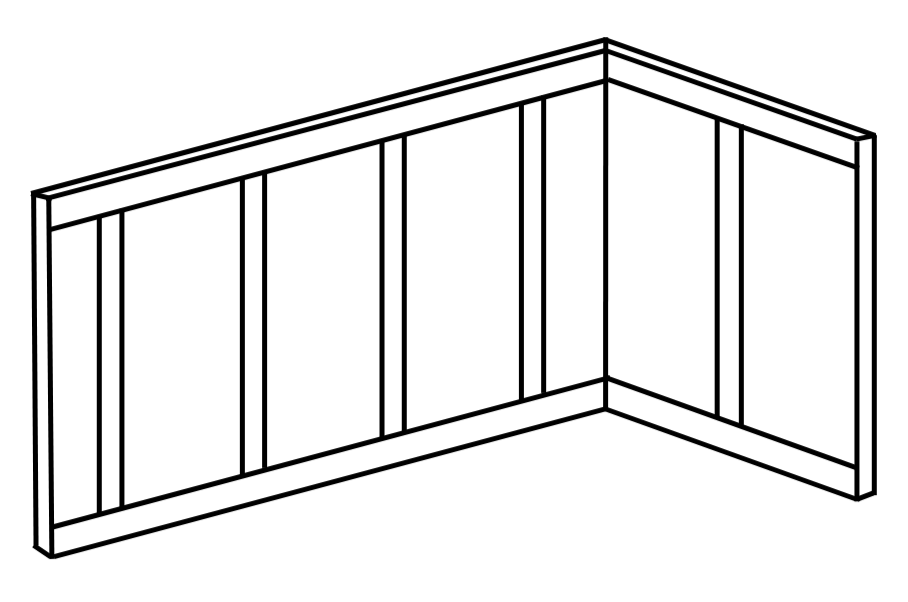
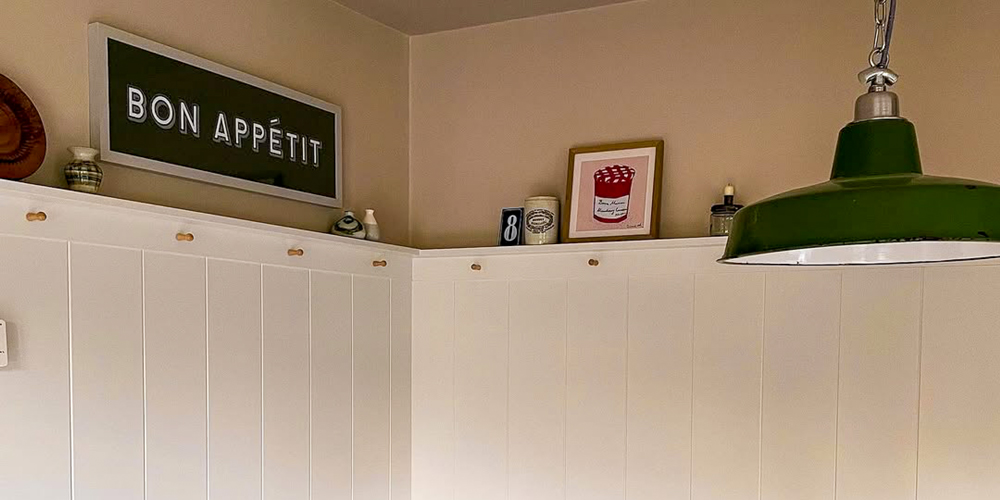
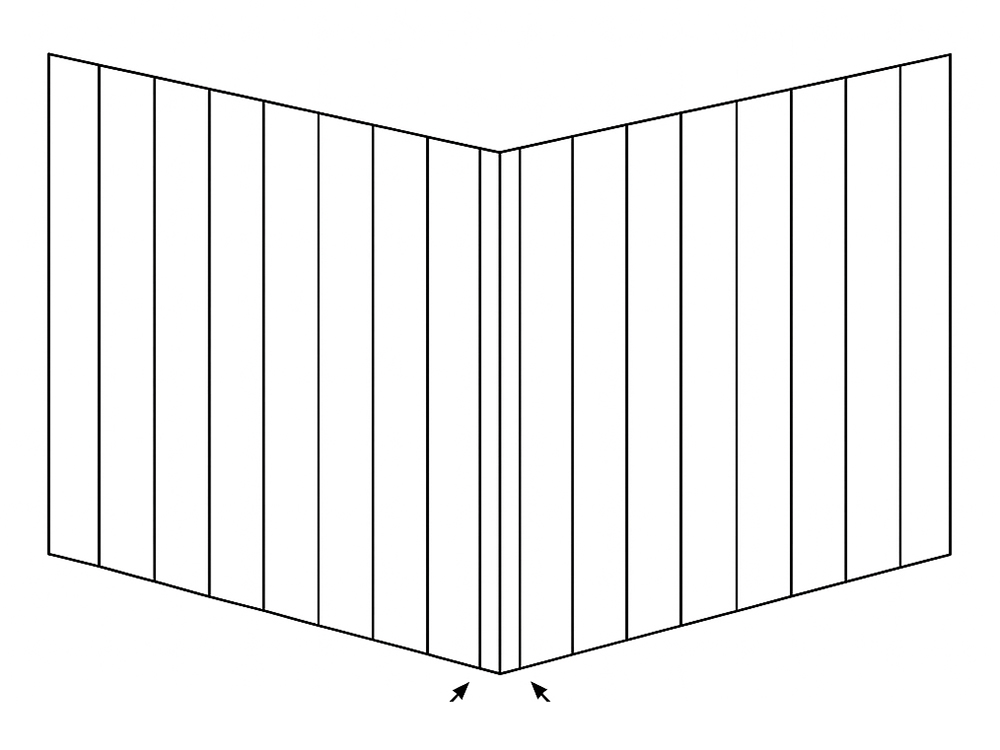
Shaker panelling creates a timeless grid-like pattern using vertical battens (columns) and horizontal rails. The key to professional-looking results across multiple walls is achieving consistent spacing between vertical battens, especially where walls meet at corners.
The Core Issue:
Each wall's batten spacing is determined by dividing the available wall width by the number of battens. When walls have different widths, this creates different spacing between battens, leading to visual discontinuity at corners.
Example of the Problem:
Wall A (2400mm): 4 battens = 465mm spacing Wall B (2200mm): 4 battens = 425mm spacing 40mm difference in width creates different panel spacing on each wall.
Option 1: Individual Wall Kits How it works: Order separate kits sized for each wall's adjusted width.
Pros:
Simpler to plan and order
You can tackle one wall at a time
Easier to manage storage and delivery
Cons:
If each wall is a different width, there is potential for different batten spacing on each wall.
Option 2: Combined Kit How it works: Order one kit sized for the total combined width of all walls.
Combined width = Sum of all adjusted wall widths Example: 3000mm + 2482mm + 1982mm = 7464mm Order one kit for 7464mm total width
Pros:
Perfect spacing consistency across all walls
Continuous visual flow around corners
Cons:
You will need to cut the horizontal battens to size for each wall
Corner Considerations
When panelling multiple walls:
Always measure wall widths from corner to corner.
If two walls meet, the panelling on one wall will reduce the starting point of the next wall by the panelling’s thickness.
For example: If Wall A is 1000mm wide and your battens are 9mm thick, once Wall A is panelled, Wall B now has 9mm less width starting from that corner. So you would record Wall B’s width as 991mm instead of 1000mm.
V-Groove Panelling
If you are planning to panel more than one wall using V-Groove panelling kits, there are some key layout and visual considerations that can affect how seamless your installation looks.
1. How V-Groove Kits Are Supplied
V-Groove panelling is cut into boards no wider than 600mm each for easier handling and delivery.
If your wall width isn’t an exact multiple of your chosen groove spacing (80mm, 120mm, 180mm, or 220mm), the two end boards—on the left and right—may be narrower than the other boards.
Groove Spacing Impact:
Groove layout is always centre-aligned. This means grooves are balanced around the centre of your wall, not simply repeated from left to right.
End segments may therefore be smaller to maintain that balance.
2. How Panels Are Cut for Joining
It is likely that you will have multiple boards making up the width of one wall. They are cut so they can be joined along a groove. This creates a seamless finish - grooves appear continuous with no visible flat panel joins between boards.
Left and Right End Panels:
The panels at the very left and right of a kit are cut at a straight 90-degree angle - not along a groove so that they sit flush against the wall.
These panels may have a narrower width than the standard groove spacing due to centre alignment.
3. What This Means for Panelling Multiple Walls
If you order a separate kit for each wall, each wall’s groove layout is calculated independently.
This means:
Groove spacing may not match perfectly where two walls meet - especially if the end panels on both walls are narrower than the main groove spacing.
At the corner join, you may see two smaller groove segments next to each other rather than a continuous groove pattern.
If you order one combined-width kit for all the walls together you can maintain consistent groove spacing across multiple walls, however you will need to cut panels yourself to fit each wall.
4. Handling Dado Rails
Shaker panelling often finishes with a dado rail on top:
For internal corners, you must mitre cut the dado at a 45-degree angle so it meets neatly.
For external corners, order additional length of dado and cut mitre joints outward.
➡️ Best Practice: Order dado separately rather than as part of your main kit, especially for multiple walls. This allows extra flexibility and helps ensure you have enough for corner cuts.
Perfect measurements and great quality, exactly what we ordered .. thank you 🤩
Carol Scanlan,
11 hours ago
Verified
Easy to order
Easy to order, prompt delivery, perfect fit for the window and hosepipe
Mary Bronks,
13 hours ago
Verified
Great website
Great website, great design and delivery safe and secure. Excellent product
Paul S,
14 hours ago
Verified
Arrived quickly
Arrived quickly, exactly as ordered
customer,
14 hours ago
Verified
Cut to my specifications and arrived…
Cut to my specifications and arrived promptly
S,
15 hours ago
Verified
Outstanding service
Outstanding service
Mr Crowe,
15 hours ago
Verified
Great service
Great service. 👍
Nick Martens,
17 hours ago
Verified
Quality products and service
Quality wood, good price, quick delivery and superbly packed to ensure no dings or dents on arrival!
Ted,
19 hours ago
Verified
All good
All good, turned up on time - no complaints with product.
Website User,
19 hours ago
Verified
I thing diagram for cutting the exhaust…
I thing diagram for cutting the exhaust hole could be improved to show position on panel
Simon ,
19 hours ago
Verified
Quick and accurately supplied in a…
Quick and accurately supplied in a chatty manner... great
suevalleyfach,
19 hours ago
Verified
First time using this company
First time using this company, would definitely use again. Good service, all cut correctly, what's not to like.
W Sullivan ,
19 hours ago
Verified
Good quality product
Good quality product, there was a slight problem with the order(my fault), but it was quickly resolved by friendly staff. .
JP,
20 hours ago
Verified
Very easy to place the order to the…
Very easy to place the order to the exact dimensions I required.
Arrived on time and protected well.
Lawson Brooks,
21 hours ago
Verified
Fast delivery and well packaged
Fast delivery and well packaged, accurately cut to size product.
mark stevens,
22 hours ago
Verified
Cut to perfection
Cut to perfection, deliver on time and packing was sturdy
Michael Welsh,
23 hours ago
Verified
Fast delivery and cut to exact size required
It was easy to order. I gave the measurements and the acrylic mirror was cut to the exact size. It arrived very quickly.
The purpose for this mirror was to fit in a gold effect ornate frame and is to be used as a prop on which to affix the individual table plan for my daughter’s wedding. It’s perfect for this.
However, if I was to use it as an exact mirror reflection without distortion it would need to be fixed to a backing.
LesleyClark,
1 day ago
Verified
Easy ordering
Easy ordering, great options, fare price with super fast delivery. Will definitely use again. Thank you.
Dawn M,
1 day ago
Verified
Competitive pricing
Competitive pricing, quick delivery, we definitely use again.
Rob,
1 day ago
Verified
Great service...excellent product
Made my order via their website which was straightforward and easy to use. Billing and delivery were efficient ...the whole process was very simple.
The product...mdf strips for a wall panelling project were accurately cut to size and suitable for the job.
Very pleased with their service and product...will definitely order again and recommend them to anyone looking for a bespoke service at a competitive price.
Carolyn ,
1 day ago
Verified
Ace experience
Fast delivery; well packed; arrived safely. Got what I ordered. Will buy from again!
Sara,
1 day ago
Verified
Outstanding customer service
Outstanding customer service, great interactive website, messages dealt with quickly by helpful knowledgeable staff. Superb product and excellent delivery schedule.
Paul Clark,
1 day ago
Verified
Needed to replace a bit of flooring
Needed to replace a bit of flooring. Could have bought a board and cut if to size. For a price less than the board got it cut to size from here. As a non trade with no tools or skills this was easiest.
Dave,
1 day ago
Verified
Excellent
Quick delivery and timber cut to the sizes requested. All well packaged to prevent damage during transit.
Gavin Drew,
1 day ago
Verified
Perfect size and exactly what I wanted
Perfect size and exactly what I wanted. Thank you!
Adam Doyle,
1 day ago
Verified
Great service
Great service
Slawomir Gburzynski,
1 day ago
Verified
Good fast service excellent quality…
Good fast service excellent quality well priced
Customeriain macgillivray,
1 day ago
Verified
Good fast no Hassle turn around.
Good fast no Hassle turn around.
Andrew Blyth,
1 day ago
Verified
Delivered as expected and items arrived…
Delivered as expected and items arrived well packaged and protected. Perfectly cut to my measurements, no rough edges just perfect.
What more could you ask for. Many thanks Bob
bobc95,
2 days ago
Verified
Excellent customer service
Excellent customer service. Can actually speak to a live person on the phone.
I am so happy with my experience.
Love my bedroom after using these panels
My favorite room in the house
Claire Barley,
2 days ago
Verified
The delivery was on the date promised
The delivery was on the date promised. The acrylic we ordered was of high quality and the correct thickness for our job. When we opened the packaging the cream colour looked an exact match to the colour on the website and the colour we wanted, however when the protective covering was removed, it is much yellower than we wanted, hence only 4 stars. At some point we will remove it and replace it with some blue.
I would use the company again, as reproduction on a screen is difficult.
Mrs Burchell,
2 days ago
Verified
Value for Money
Packaging was carefully considered and well packaged.
Delivery was fast.
Item was perfect.
Good value for money and good ordering experience
DM,
2 days ago
Verified
Just a great service
Ease of ordering, simple as.
Graham,
2 days ago
Verified
Exactly what i asked for
Exactly what i asked for
Fast delivery
Great price
sophie gayle,
2 days ago
Verified
Excellent
Excellent, just what I needed for my AC unit.
J S,
2 days ago
Verified
All that I ask for was cut to size and…
All that I ask for was cut to size and shape. Delivered. On time. Great price.
What more do u want.
B. Goodchild,
3 days ago
Verified
Product arrived exactly as ordered
Product arrived exactly as ordered. We'll packaged. Sturdy shelf, good quality. Will use them again
Debbie sams,
3 days ago
Verified
Really pleased with the worktops from Cut My
Everything came exactly as anticipated, on time, and fantastic quality. Being used in a micro-camper conversion and wanted 18mm worktops to keep the weight down.
Really pleased!
Julian Wilson,
3 days ago
Verified
All good
All good except I thought I requested curved corners. Maybe I got that wrong.
The ply does what I needed
catherine oliver,
3 days ago
Verified
Easy to order.
Easy to order.
Quick delivery
Well packaged to avoid damage
Excellent product
Dianne,
3 days ago
Verified
Amazing service and quality
Really fast service, good quality products and finish. Has created a beautiful space! Would 100% use again.
Only slight downside is that we didn't have any physical instructions in the packaging but all was available online... And easy either way!
Aimee Forrest,
3 days ago
Verified
looks really good
looks really good , and has made a nice "breakfast bar" from it
DANIEL,
3 days ago
Verified
Great choice of materials
Great choice of materials, cut exactly as required, very fast delivery.
Customer Tony ,
3 days ago
Verified
Eight out of Eight !!
All good.....eight different pieces cut to my precise measurements....no complaints at all !
Graham,
3 days ago
Verified
Great product / Great delivery
Product delivered promptly and as ordered.
My potting shed looks brand new.
Michele Watson,
3 days ago
Verified
Great and fast service
Great and fast service
Kev,
3 days ago
Verified
Excellent Service
I couldn't place my order online (system error on my computer) so I spoke to someone and they completed the order within seconds, sent the invoice and processed my order. Within a week my custom shelves had arrived, sizing was perfect!
Excellent and efficient service with prompt delivery. Will be using again.
Kirsty Farrugia,
3 days ago
Verified
Highly accurate cutting, though my project is currently on hold!
I ordered a custom 5mm double-sided frosted acrylic sheet (1420mm x 430mm) with two 130mm diameter holes to mount a dual-hose portable air conditioner using magnetic strips.
The acrylic itself is absolutely fantastic. CutMy executed the dimensions and the hole cutouts perfectly to my exact specifications. The frosted finish looks great and the material quality is excellent.
Unfortunately, my project is temporarily stalled because the AC retailer accidentally sent me a single-hose unit instead of a dual-hose model. To make matters worse, dual-hose units are now completely out of stock everywhere in the UK. I am currently facing a dilemma where I might have to manually modify this perfectly cut piece of plexiglass to accommodate a "hose-in-hose" configuration instead.
Despite my external issues with the appliance, CutMy did an amazing job with the fabrication. I already have a few other projects lined up for later this year and will absolutely be using them again. I can safely recommend this company for precise, high-quality custom plastic cutting.
Michael Shelley,
3 days ago
Verified
I orderd on line ,and had a great…
I orderd on line ,and had a great service, grest product. Very happy.
Byron Ford,
3 days ago
Verified
An excellent service for people who do…
An excellent service for people who do not have their own cutting facilities.
Brian Threapleton,
3 days ago
Verified
Excellent service
Excellent service, product and prompt delivery.
Barry ,
3 days ago
Verified
Well cut
Well cut. Delivered with care
Kevin McIntyre,
3 days ago
Verified
Excellent service
Excellent service
DAVID COTTER,
4 days ago
Verified
Perfect cut
Perfect cut, so happy with service and delivery
OlaToyin Ade,
4 days ago
Verified
CutMY did an excellent job
CutMY produced the window cover I needed cut to size perfectly and very quickly.
Michael Daly,
4 days ago
Verified
Easy to order and good delivery
Easy to order and good delivery
lynn short,
4 days ago
Verified
Easy choice, super price, great delivery
So easy to find the plexiglas i needed, exact measurements, brilliantly packaged and arrived bang on time.
Price is great too
Richard,
4 days ago
Verified
Exactly what I asked for ...
I ordered two sheets of clear perspex with a hole in each and that's exactly what I received. Exactly the sizes I asked for and they arrived in good time although getting the protective film off was a bit of a bugger.
Kevin,
4 days ago
Verified
brillinant people helpful, frendly i made an order then changed and added…
i made an order then changed and added to it, this company were so helpful, realised i then needed two further sheets, i did not order and did not write the sizes down, the lady at this company then sent me all the sizes and added a cost for the additional items and kindly emailed me, at my age i need reminding the went above and beyond for my super nice company to deal with and order arrived within a few days no problems at all. 100% recormend this company to deal with, i used them during lock down for a large shed i built in the garden, super nice people to deal with.
Derek Betts,
4 days ago
Verified
Brilliant service
Brilliant service. The quality of the wood was exceptional and looks fabulous when lacquered. I chose a nice piece of oak veneer to replace my cheap-looking white MDF desktop. Now the desk looks premium. Quick delivery and a very reasonable price. I'd definitely use them again.
LS,
4 days ago
Excellent service
Excellent service, the parts ordered were top quality. It arrived before the expected delivery date. The delivery driver communicated the deliery drop off time throughout to make sure I was around to take delivery. I will be using this company form here on out, you cant get a better all round service than these guys! 12/10 would reccomend!
Jack Harvey,
4 days ago
Verified
The experience was great
The experience was great. Timely delivery. Good quality Panel. And excellent customer service.
Saba Zareem,
4 days ago
Verified
Very useful for my air conditioner
I ordered a clear piece to help seal my window as it was an outward hinging window on the top floor of the house, so fabric ones would collecting rainwater and would go mouldy.
It was exactly the size requested and the cutout was perfectly measured to the point that the exhaust hose didn’t need anything to hold it in place as the fit alone keeps it right where I want it.
Ben Smith,
4 days ago
Verified
Excellent service
Excellent service. Website and ordering process was easy to use. High quality product.
N Robinson,
5 days ago
I ordered a table top
I ordered a table top. It was cut and delivered promptly. Sadly the corner was damaged in transit. If I pushed that corner against the wall as intended, the damage is not visible. The perfectionist in me wanted a replacement but the realist won out ...only I know its damaged. Cut my offered to replace the table top immediately but when I contacted them offered a reasonable discount. This is just good flexible service.
Neil,
5 days ago
Verified
Great service and excellent product has…
Great service and excellent product has made air conditioning much better in bedroom. Would use again and recommend
Chris Giles,
5 days ago
Verified
Would definitely use again
The choice of woods the colours and the price. The service was excellent and updates on delivery were good except for a delivery driver failing in his job and declared we weren't in !!!! However, there was a phone number to contact the delivery company and the goods were delivered the following day. The shelves fitted perfectly and finished off a cupboard beautifully
Rosemary Petheram,
5 days ago
Verified
Good product
Good product, good staff, would use again.
Mr/Mrs Rodger,
5 days ago
Excellent service from start to finish
Excellent service from start to finish. Extremely happy with my order, had perspex with vent hole for my portable air con unit. Fits perfect over window. so neat. Cost very reasonable and quality just perfect. Thank you would highly recommend.
Alison Ofield,
5 days ago
Verified
Great service
Great service, saves time having a kit to work with, would have taken days to cut the parts myself. Price well worth all that cutting.Neat and accurate cutting - definitely use again.
Stephen Williams,
5 days ago
Verified
Made exactly to size and delivered promptly
The two doors were made exactly to the specified dimensions. They are well made and now safely installed. They arrived well packed and very promptly.
Martin Horsler,
5 days ago
Verified
The item I ordered was cut to the…
The item I ordered was cut to the correct size expertly packed and arrived promtly
Kenneth Satterthwaite,
5 days ago
Verified
great service speedy delivery
great service speedy delivery
Mr simon coward,
5 days ago
Verified
Order received one day earlier than…
Order received one day earlier than expected and delivery driver brought the order inside can only say it is an excellent service
smith,
5 days ago
Verified
Very quick delivery
Very quick delivery, good packaging and delivery tracking all spot on.
Mr White,
5 days ago
Verified
My order was delivered quite quickly…
My order was delivered quite quickly and beautifully wrapped. It was exactly what I wanted, there's not much more to say except that I'll be back again sometime.
Very many thanks,
Ron Smeed
Ron Smeed,
5 days ago
Verified
Website easy to use
Website easy to use. Good packaging.exactly as requested great service
David A,
5 days ago
Verified
Straightforward and quick delivery
Straightforward and quick delivery! All specifications done correctly. Good product.
Michelle,
5 days ago
Verified
Custom sizes made easy
Custom sizes made easy! Simple website to find what you need. Add you measurements and it's shipped really quickly, very well packed and perfectly cut. Brilliant service.
Andrew Broadley,
5 days ago
Does what it needs to do
Ordered portable AC acrylic, dimensions perfect for my window and it works as it should but for some reason the plastic has heavy scratches not sure what from but still works as intended. Quick shipping and safely delivered.
Matt,
5 days ago
Excellent Customer Service
Excellent Customer Service
Ordered Friday
Made and Dispatched Saturday
Delivered Tuesday
Installed it today (Wednesday!)
Excellent = 5 Stars
MR. B
MRS . BOFFIN,
5 days ago
Verified
Quick delivery
Quick delivery
Luke Hind,
5 days ago
Verified
Easy to order and fast delivery
Easy to order and fast delivery
Madison,
5 days ago
Verified
great experience
I recently order some plexiglass cut to size with a hole for connecting our portable ac unit to a pvc casement window opening. Item was delivered quickly, very well packaged and cut to size perfectly. would recommend and use again.
Steve (Buckinghamshire),
6 days ago
Verified
Perfect!
Great service, quick delivery,
Cut to exactly what I asked for.
Perfect!
Lisa ,
6 days ago
Verified
Good communication from the company
Good communication from the company and despite a day delay from the original quote, it arrived quickly. The product is exactly as specified with the the only downside being that it is a little expensive. BUT, it works!
Alastair Armstrong,
6 days ago
Verified
Great company
Great communication and fast delivery, well packaged. Will cut to your own dimensions. Will use again…
colinspike123,
6 days ago
Does what it says on the tin
Ordered two 18mm melamine mdf shelves for a wardrobe and they arrived promptly and accurate to size. I like the fact you can choose which side/s to add edge banding to on the website. Delivery was a bit pricey but worth it to know you are getting a decent product.
Casper,
6 days ago
Verified
Perfect for my air conditioner hose…
The acrylic was nice and thick fitted my window perfectly. Absolutely great for my air conditioning hose to go through the hole which again was a perfect fit. Communications from the company were excellent. Wouldn’t hesitate to recommend them.
Melanie Weeks,
6 days ago
Verified
As I only ordered samples a review is…
As I only ordered samples a review is not applicable
P Jeffers,
6 days ago
Verified
Highly recommend! Perfect table top
Really happy with our acrylic table top replacement.
Easy to order with all the specifications, and came very quickly and packaged very well.
Looks lovely on our table, and has already had lots of use!
Would highly recommend ⭐⭐⭐⭐⭐
Tara,
6 days ago
Verified
Very pleased..
Excellent quality and timely despatch.
Davie Emm,
6 days ago
Verified
Easy to place the order
Easy to place the order. Good price and fair shipping cost. Well packaged and quality cut mdf backing for picture frames.
Name ROB WOOD,
6 days ago
Verified
Great product cut to my specifications…
Great product cut to my specifications and well made. I would use this company again.
Catherine Harris,
6 days ago
Verified
Easy to use website
Easy to use website. Accurate description carefully packed and dispatched on time. I will use again.
Mr Leslie Morgan,
6 days ago
Verified
Excellent product for mobile air con units
Excellent product, arrived quickly and was cut precisely. Thank you and highly recommend your perspex solution for venting mobile air conditioners.
Roy G,
6 days ago
Verified
Amazingly straight forward to get sized…
Amazingly straight forward to get sized up and ordered.
The sizing and graphical display during the ordering process is a great idea and very helpful. I would strongly recommend 'Cut My' and will be certainly using their services when needed in the future.
The delivery was excellent and great value.
customer,
6 days ago
Verified
Highly recommend
The website was wasy to order from. The delivery was quik and efficient and the product was exactly what was needed!
Highly recommend.
Jenna Jarvis,
6 days ago
Verified
Good quality board
Good quality board, accurately cut to size and well-packed for delivery.
IanB,
6 days ago
Verified
quality service
quality wood, cut perfectly, packaged carefully and delivered.
Ambrose,
1 week ago
Subscribe to our email newsletter
Sign up here for our occasional email newsletter with new products, design ideas and discounts across our huge and growing range of products. (You can unsubscribe at any time of course.)