The store will not work correctly when cookies are disabled.
Cookie Preferences
We use cookies and similar technologies to enhance your experience and ensure smooth order processing and to improve our website by analysing visitor behaviour or personalise content and show relevant offers.
Essential cookies are required for the site to function and cannot be disabled. By clicking "Accept" you agree to all cookies, including analytics and marketing. To decline non-essential cookies, click "Decline".
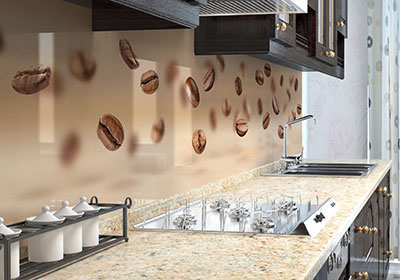
How to Measure a Splashback (The Ultimate Step-by-Step Guide for a Perfect Fit)
Knowing how to measure a splashback correctly is the most important step before ordering acrylic, glass or aluminium splashback panels. Whether you're renovating a kitchen or adding a modern feature behind the hob, accurate measurements ensure your splashback fits perfectly, lines up with your sockets, and installs without gaps or trimming.
This complete guide walks you through every measurement you need, from standard rectangular panels to more complex layouts with cut-outs, corners and extractor hoods. No previous DIY experience is required, just a tape measure and a few minutes.
Why Getting Your Splashback Measurements Right Matters
Ordering a splashback cut to the wrong size can result in:
Visible gaps
Edges that don't align with cabinets
Socket plates that won't sit flat
A panel that simply won't fit the space
Most splashbacks are custom-cut, so mistakes can be costly. Following this guide will help you get measurements accurate to the millimetre, ensuring a smooth installation and a professional finish.
What You Need Before You Start
To measure a splashback accurately, gather:
Tape measure (preferably a metal one for accuracy)
Pencil and notepad
A simple sketch of your splashback area to note measurements on
Step 1: Inspect the Splashback Area
Before taking measurements, look closely at the space:
Check for:
Uneven walls (common in older homes)
Worktops that slope or bow
Tiles with protruding edges
Sockets or controls that interrupt the space
Cooker hoods at different depths
Wall units that are slightly off level
Because very few walls are perfectly straight, it’s essential to measure in multiple places.
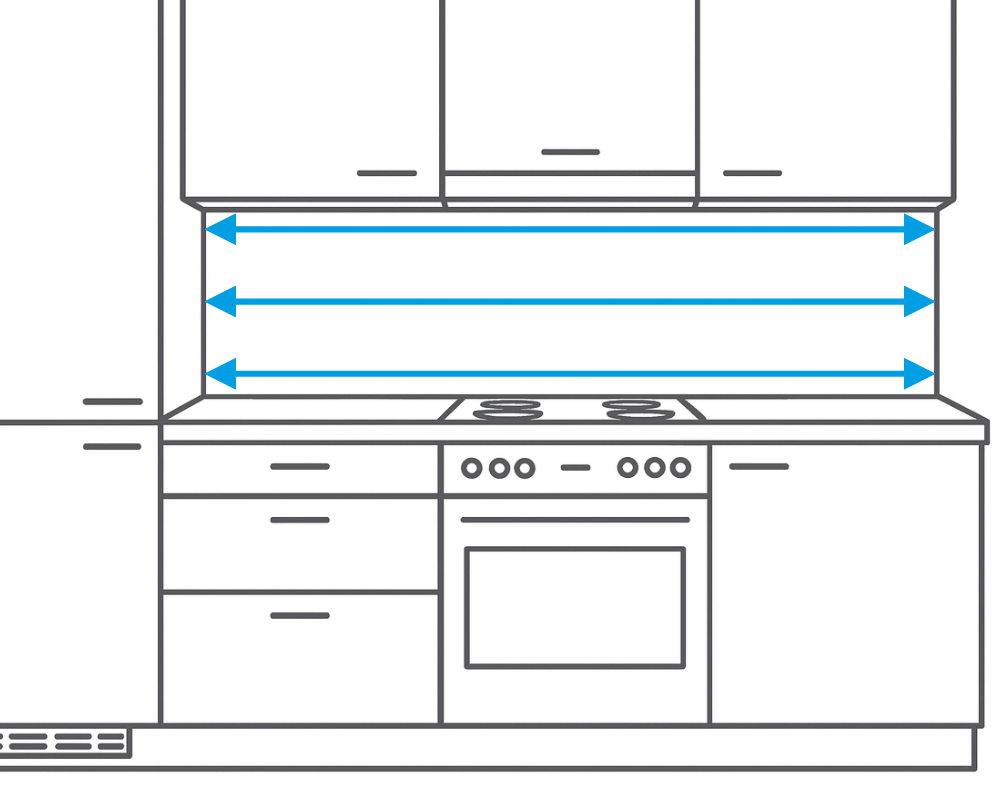
Step 2: Measure the Width
Width is one of the most important measurements when ordering a splashback.
How to measure the width:
Measure the full width along the worktop where the splashback will sit.
Measure again halfway up the wall.
Take an extra measurement just below the cabinets.
Use the smallest measurement — this prevents tight spots caused by uneven walls.
Important: If your wall bows inwards, the smallest measurement ensures the splashback fits into the narrowest part.
Measure in three places and take the smallest measurement
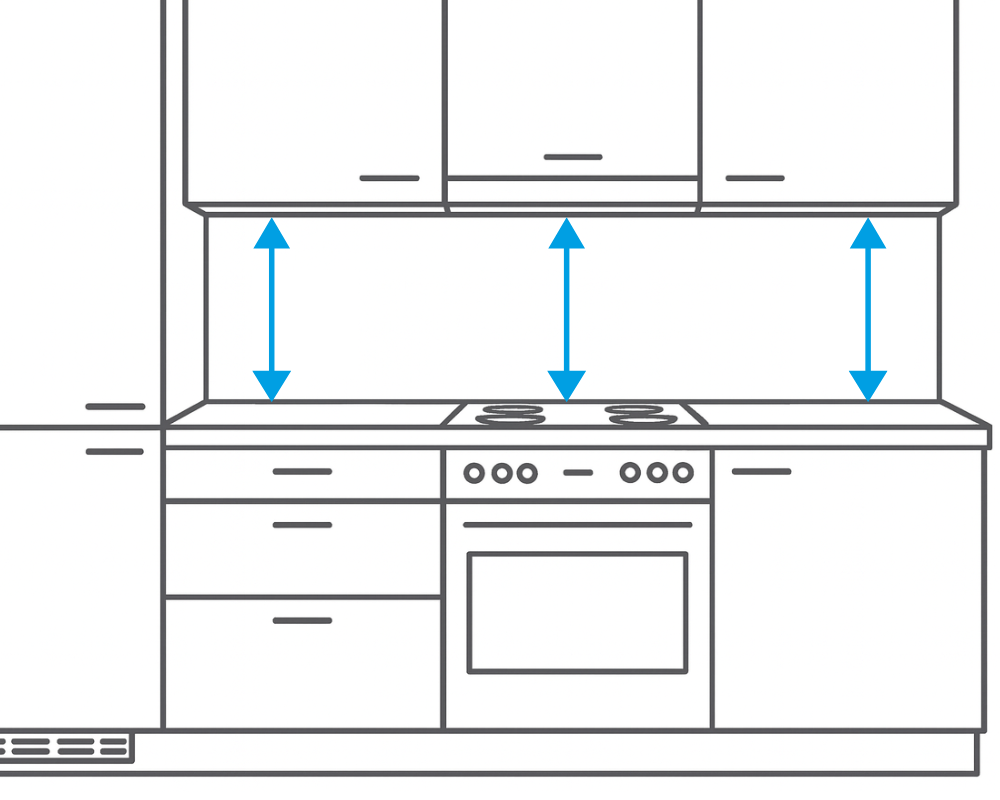
Step 3: Measure the Height
Next, measure the height of the splashback area.
How to measure splashback height:
Measure from the worktop to the underside of the wall units
If there are no wall units, measure to your desired height (e.g., 600mm or full height to extractor)
Measure at two or three points
Use the smallest number
Measure in three places and take the smallest measurement
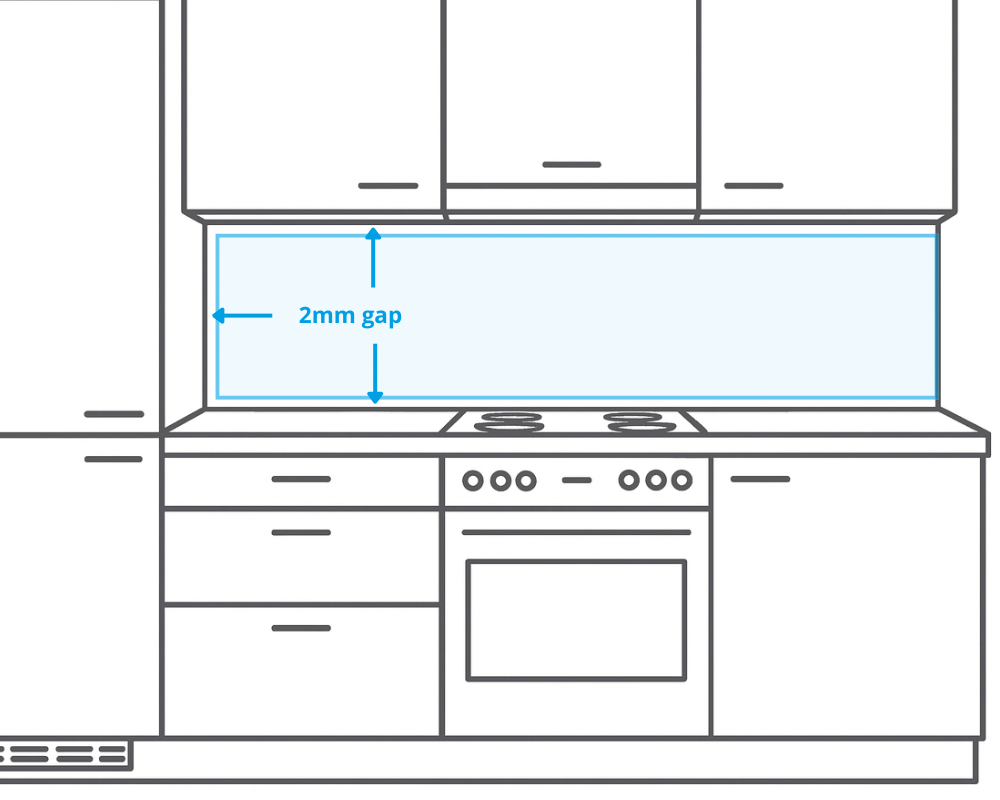
Step 4: Expansion allowance
Minus 2mm from every side of the splashback that meets a wall or object.
Why is this important?
When measuring, it’s important to allow for natural expansion. Splashbacks, worktops and cupboards can all expand in heat. If a splashback is fitted too tightly, without any room to expand, it can press against surrounding surfaces and eventually crack.
To prevent this, we advise leaving a 2mm expansion gap on every edge where the splashback meets a wall, cabinet, or any other fixed object. This small allowance ensures the panel can expand safely and maintain a perfect fit over time.
Minus 2mm where the splashback meets a wall or object
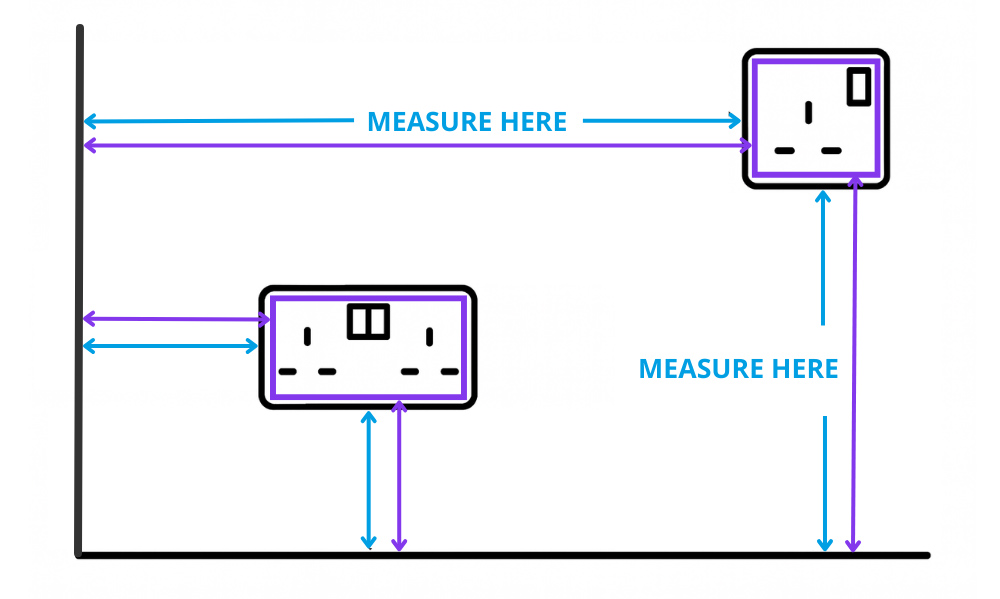
Step 5: Measuring Around Sockets, Switches & Obstacles
Most kitchens have multiple sockets along the worktop, so accurate cut-out measurements are essential.
You need to record:
Height and width of the socket - minus 10mm (a standard double is 145 x 85mm, standard single is 85 x 85mm, so your socket size would be 135 x 75mm or 75mm x 75mm)
Horizontal distance from the left wall or edge of the splashback (Offset Left) - plus 5mm
Vertical distance from the worktop to the bottom of the socket (Offset Bottom) - plus 5mm
FINAL MEASUREMENT: Minus 10mm from socket size and add 5mm to offset left and bottom to make sure the splashback sits behind the socket faceplate.
Repeat for:
Double sockets
Fused spurs
Cooker switches
Isolation switches
Ethernet or USB ports
Control boxes (boilers, hobs, etc.)
Step 6: Measuring a Splashback Behind a Hob or Extractor
Whether you have a gas hob, induction hob, or an angled extractor hood, the process is similar.
How to measure this area:
Measure from the hob surface to the bottom of the extractor
If installing a full-height splashback, measure from the worktop to the extractor
Take two or three measurements and choose the smallest
If the extractor widens at the bottom, measure the narrowest point
Step 7: Measuring L-Shaped, U-Shaped, or Multi-Section Splashbacks
If your splashback needs to cover more than one wall or an area with corners, divide it into sections.
How to measure complex splashbacks:
Break the area into simple rectangles
Measure each rectangle separately
Mark where the joins or corners meet
Note all socket positions relative to each individual section
You do not need to draw a perfect diagram — just a clear sketch. We have several splashback templates you can download and print for some simple shapes.
How to Measure Splashbacks for Internal Corners (Butt Joints & Overlap Joints)
Measuring an internal corner can look complicated, but once you understand how each joint works, the process becomes very straightforward. Internal corners are fitted using either an overlap joint or a butt joint, and the measurements differ slightly depending on which method you use.
Below is a simple explanation of both methods — including exactly what you need to deduct for a perfect, tight-fitting corner.
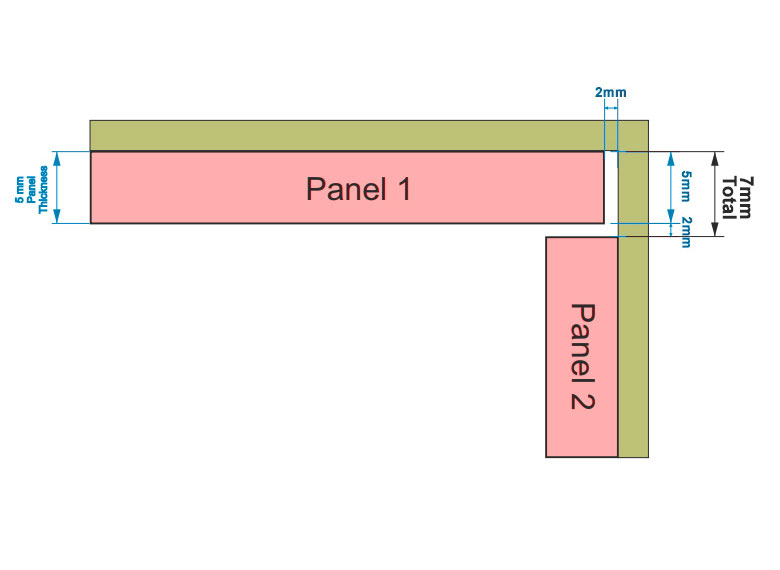
Option 1: Overlap Joint (Panel Over Panel)
An overlap joint is where one splashback panel slightly overlaps the edge of the next panel. This method is ideal if you want to reduce visible silicone lines and create a cleaner internal corner.
How to Measure for an Overlap Joint
Measure the full width of your first panel section.
Deduct a 2mm expansion gap (for acrylic or composite panels).
Now deduct:
The full thickness of the second panel, plus
An additional 2mm to ensure the overlap sits comfortably and doesn't force the panels apart.
This gives you the correct finished width for the first panel, so it sits neatly behind the second.
Why choose this method?
Minimal silicone needed
Cleaner corner appearance
Great for modern, seamless installations
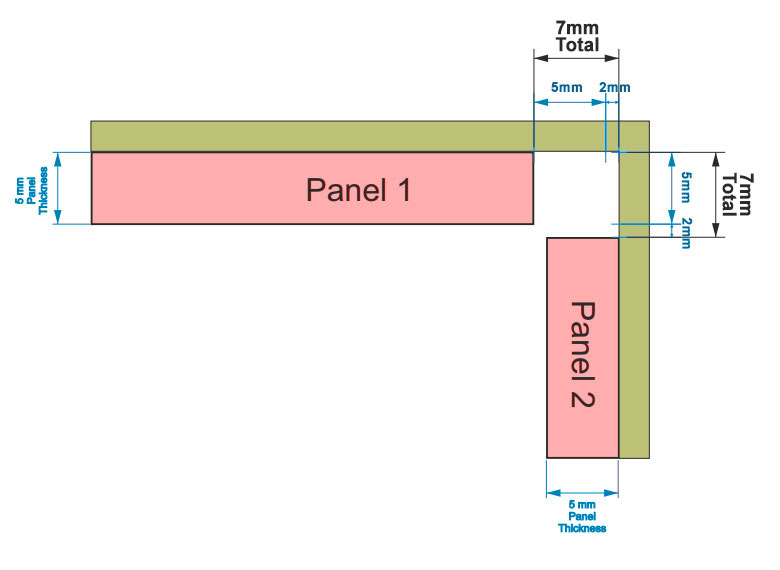
Option 2: Butt Joint (Panels Meet in the Corner)
A butt joint is where both panels meet flush in the corner — edge to edge. This method is commonly used with corner trims and gives more flexibility during installation.
How to Measure for a Butt Joint
For each panel:
Start with your full panel width as measured.
Deduct the panel thickness from the edge that will sit in the corner.
Allow a 2mm expansion gap.
Repeat the same calculation for the second panel that meets it in the corner.
This ensures both panels sit comfortably within the corner without forcing or bowing.
Why choose this method?
Works perfectly with corner trim profiles
Allows easier adjustment when fitting
Silicone can be used to create a smooth, flexible join
Finally: Double-Check All Measurements
Before placing your order, check:
Have you used mm, not cm?
Have you recorded the smallest width and height?
Have you allowed for expansion (if required)?
Have you added 5mm overlap to socket measurements?
Are your cut-out positions clearly marked?
Frequently Asked Questions
How do you measure a splashback accurately?
Measure width and height in several places in millimetres, use the smallest measurement, and record socket positions carefully. Repeat and check your measurements.
What is the standard height for a kitchen splashback?
Most splashbacks are 600mm high, but you can measure from worktop to cabinets or choose a custom height.
How much clearance do you need for sockets?
Add 5mm extra around each socket cut-out so the splashback sits neatly behind the faceplate.
Do I need to account for expansion?
Splashbacks require a 2mm expansion gap.
Can I measure my own splashback or do I need a professional?
Most people can measure their own splashback using a tape measure. Only highly complex shapes may benefit from templating.
Final Checklist: Your Splashback Measurement Summary
Measure width at several points → use smallest
Measure height at several points → use smallest
Reduce by 2mm for expansion
Measure all socket positions and sizes
Add 5mm overlap for socket cut-outs
Sketch each section clearly
Double-check everything in millimetres
With these steps, you'll be able to order a splashback that fits perfectly the first time.
Ready to Buy Your Splashback?
We have over 70 styles and colours to choose from. Whether you want a glossy acrylic splashback, a luxury glass one or a contemporary brushed look we can help.
Very efficient, fast delivery, precise size as ordered. All much appreciated.
Michael,
20 hours ago
Verified
Well packaged and arrived promptly
Well packaged and arrived promptly. Everything was spot on! Excellent service.
Kathryn,
20 hours ago
Verified
easy to order and supplied quickly
easy to order and supplied quickly
Louise,
21 hours ago
Verified
Perfect cut
Perfect cut
Delivered on time with great care
A very professional company
Great care with the packaging well protected
Lucy Bennett,
22 hours ago
Verified
Great product
Great product, fast delivery and great communication
Caroline Gamester,
22 hours ago
Verified
Quality of the product was very good
Quality of the product was very good. Only negative point was to “start “ the peel off film. The disc was cut to close tolerance.
J. Sikka,
23 hours ago
Solution for casement aircon hose
Bought cut Perspex for aircon hose for casement window as other choices were inefficient - best solution ever! Very simple idea that I can easily transfer to other prepared frames the same size. Very happy with the quality, packaging and speed of delivery ! Thankyou so much
Jacqueline I,
23 hours ago
Verified
Fast delivery and product was great and…
Fast delivery and product was great and very well packaged. May get more from them in the future
Bartosz Pietak,
1 day ago
Verified
Good Supplier
Quick turn around and reasonably priced. I will be using again.
Mr Ted Barrett,
1 day ago
Verified
Did exactly what I asked for
Did exactly what I asked, great service and delivery.
Anonymous BV,
1 day ago
Verified
Perfect cut and delivered on time
Perfect cut and delivered on time
Jeremy,
1 day ago
Verified
Excellent Service and Highly Recommended
Excellent service and precise cut and delivered on time. Highly recommended.
K Hasan,
1 day ago
Verified
Fast delivery and the pieces cut very…
Fast delivery and the pieces cut very accurately
Mike and Kath Chapman,
1 day ago
Verified
Straightforward to order
Straightforward to order. I received exactly what I had ordered on time. Great service
Tony George,
1 day ago
Verified
Circular acrylic discs
I needed two circular clear acrylic discs I measured them and ordered on line they arrived well packaged and protected I unwrapped them and they were perfect
I would definitely recommend this company to anyone really great service
zakiboy,
1 day ago
Verified
Exactly as described
Exactly as described, cut to size correctly ,and speedily delivered.
Andrew Russell,
1 day ago
Verified
All good one again
All good one again. Thanks
James McCann,
2 days ago
Verified
I ordered a walnut shelf which came…
I ordered a walnut shelf which came well packed with carboard on the corners to prevent damage. It was maybe my fault on ordering but there was no edging tape on any of the sides so I had to purchase this & fit but otherwise very good service & quality
Alan,
2 days ago
Verified
Exceptionally good on all fronts
Easy to navigate website and straightforward to customise size, thickness and type of product. Very good value for money. Prompt delivery and product fitted exactly onto each circular top. Exact profile, well finished product. Well packaged and good delivery service. Exactly what I wanted and required for garden project. Strongly recommend.
BJM West,
3 days ago
Verified
Brilliant service and delivery was…
Brilliant service and delivery was quick and perfectly packaged
Beth Watkins,
3 days ago
Verified
Great service and great product
Great service and great product
Devaka,
3 days ago
Verified
Exactly as ordered and required
Brilliant. Easy to order. Quick delivery exactly to spec and fit perfectly. All for a good price. Can’t fault it.
Bruce Lee Durrant,
3 days ago
Verified
I saw cutmy on there website.Thought i…
I saw cutmy on there website.Thought i would try this type of splash back on my own kitchen i was fitting.Measured and contacted cutmy.I picked up my splash backs both orders within 2 day s and when fitted fitted perfectly .
Such an easy process from ordering to collecting and they lookAmazing better than i imagined and easy to fit
Kevin linfield,
3 days ago
Verified
Product as described and well packed.
Product as described and well packed.
Steve Dobson,
3 days ago
First class service
Perspex cut precisely to size, with a correctly sized hole exactly where I wanted it.
They also used a very good delivery company who were very responsive to my request for a slight delivery change.
First class service
Pete,
3 days ago
Never ever had to to have a custom…
Never ever had to to have a custom sheet of plastic cut to size with well placed hole for an air conditioning unit exhaust…. But these guys nailed it. Designed by me using an intuitive app on their website then ordered and arrived well packed 2 days later. Fit my window like a dream…. Amazing. Couldn’t recommend more highly. Will definitely use again
JR,
3 days ago
I ordered a window seal sheet cut out…
I ordered a window seal sheet cut out for my air conditioning extract pipe.
The measurements were very precise and the product is excellent!! Now my air con is properly sealed and looks really good vs. Those awful window seal kits.
Really quick next day delivery too by one of the best couriers (APC). Thank you so much!!
Emily Ch,
3 days ago
Verified
Very easy and professional
Job was right and was delivered on time .easy to order
steven higson,
3 days ago
Verified
Successful solution
We were looking for a solution for portable air con exhaust hose, their bespoke option was both simple and effective.
Colin Allchin,
3 days ago
Verified
Items where just as ordered
Items where just as ordered, good looking and what I wanted. Prompt delivery and well packed.
Michael Whelan,
3 days ago
Verified
Quick delivery done the job
Quick delivery done the job
harry,
3 days ago
Verified
Total novice here… so easy to order
Total novice here… so easy to order. Measured up; entered the details and items delivered a couple of days later almost export packed to keep the items free from damage. Very impressive. Shelves ordered were high quality and fitted perfectly. Thank you.
simon todd,
3 days ago
Verified
Great service and fast delivery
Great service and fast delivery
Karen Crawford,
3 days ago
A/C Window Seal Acrylic Sheet is a game changer
Had to find a cheaper alternative to installing permanent a/c at the company I work for, so bought a portable unit, then found CutMy for their clear made to measure acrylic sheet air conditioning window seal. Measured up (including the size and position of the hole for the a/c exhaust vent hose) and placed the order. Initial delivery was damaged in transit (not CutMy's fault) so reported it to customer service (with photos of the damage) and they arranged a replacement the same day (delivered a couple of days later). Next delivery was even more securely packed and size and cut out placement were perfect. Now have a very happy team in my office, especially with the temperatures this week! When I come to fit out other offices in my building with similar set up, CutMy will be my go to for the a/c window seal sheets! Great product and responsive customer service
A. Welbourn,
3 days ago
Verified
The marine ply I ordered was good
The marine ply I ordered was good quality and precisely cut and well packaged to avoid damage. However the adhesive in the same order was damaged in transit. The good news is that Cut My refunded the adhesive cost, but of course this created a delay in my project.
Nick Jones,
4 days ago
Verified
Cut perfectly to measure provided
Cut perfectly to provided measure
Tamila,
4 days ago
Verified
The boards were cut exactly as I’d…
The boards were cut exactly as I’d asked and primed beautifully on both sides. I would definitely use them again in future.
Annie HenryHolland,
4 days ago
Verified
I was very happy with the whole…
I was very happy with the whole experience. I needed some wood cut to a particular size to use as painting panels. Everything was easy and smooth from the ordering process through delivery. Packaging was excellent also. Would definitely use you again!
kevinfranklinart,
4 days ago
Verified
Quick delivery
Quick delivery. Good product. Will use again. Definitely recommend
Simon W,
4 days ago
Verified
Perfectly cut
Perfectly cut, well packaged.
Andy Robbins,
4 days ago
Verified
Great fast service
Great fast service. I bought this Perspex sheet to protect the top of a piece of furniture. It arrived promptly and correct size.
sally,
4 days ago
Verified
Perfect fit.
Perfect fit.
Clive,
4 days ago
Verified
I would recommend this company
I would recommend this company. Really pleased with the oak laminate door. Perfect size and lovely finish to the oak grain. Customer services are friendly and very helpful. I found the website easy to navigate which is important when accurate measurements are needed. The door was delivered on time and very well packaged.
Mrs Julie Howard,
4 days ago
Verified
Came within a few days and very well…
Came within a few days and very well packaged
Alan Hart,
4 days ago
Verified
Easy ordering and competitive pricing
Easy ordering and competitive pricing. Quick delivery and good quality.
MA Wigston,
4 days ago
Verified
Everything was cut perfectly to my…
Everything was cut perfectly to my dimensions, it was well packaged for zero damage, much easier than trying to purchase the board and cut the items yourself.
Ray Schwer,
4 days ago
Verified
Great photo table support
I was looking for a lightweight and sturdy support for my photography 'table' and found this. Great options on sizes, including thickness with options for other minor adjustments such as corner rounding (which I thought I'd requested, but hadn't!!)
Delivery was quick too so absolutely nothing to complain about, other than my own memory!
Michael,
4 days ago
Verified
Absolutely brilliant service
Absolutely brilliant service. I needed two large circular 12 mm hardboard discs to make a large lazy Susan for a complex board game. The website was so easy to use with prices clearly listed as I was on a budget. I found an option that was perfect for me. I wouldn’t have been able to cut these discs myself. It was delivered very quickly and it was exactly what I ordered.
I recommend these guys for a competitive price, a large selection and all round general good service including fast delivery. Thank you.
Jeff H,
4 days ago
Verified
Service.Descriptors.Quality of…
Service.Descriptors.Quality of product.Accurate measurements.Quick delivery.
Malcolm Morris,
4 days ago
Verified
Impressed
Ordering was simple and the technical view was very helpful.Wood cut precisely and good quality. It made me the job much easier than cutting yourself. Delivered on time. I was very pleased and would recommend.
Peter ,
4 days ago
Verified
Excellent service and product
Excellent service both when ordering the samples and then the final product. Beautifully finished and exactly what we needed. Rang to ask a question and the assistant was knowledgeable and friendly.
Ellen Walker,
4 days ago
Verified
Good service cut to size and delivered…
Good service cut to size and delivered promptly. Should have bought a thicker panel.
nicholas hardy,
4 days ago
Verified
Easy ordering procedure.
Easy ordering procedure.
Wood arranged on time.
Good quality and measurements spot on.
Customer,
4 days ago
Verified
Very quick delivery
Very quick delivery - a couple of missing shelves which were delivered the next day but communicated to me on the same day so I knew what was happening. Excellent quality and service - would definitely use again
Alison,
4 days ago
Verified
Accurate cut, extremely well packaged.
Accurate cut, extremely well packaged.
Bill Petrie,
5 days ago
Verified
Always a1 purchase
Always a1 purchase
tina hart,
5 days ago
Verified
Great product and customer service
Ordered 3 seperate desk tops (MDF with oak veneer) with holes pre drilled and the quality is excellent.
Slight delay with shipping due to delivery company, But cutmy refunded shipping.
John,
5 days ago
Verified
Excellent Customer Service and Product
Excellent product, easy to install, and fits perfectly. Great communication, excellent customer service, and fast delivery. Highly recommended!
Kim,
5 days ago
Verified
These guys know there stuff
These guys know there stuff, great customer service. Highly recommended
matthew marchant,
5 days ago
Verified
Easy ordering
Easy ordering, fast delivery and item was as expected
Miles,
5 days ago
Verified
Perfect solution for my portable air…
Perfect solution for my portable air conditioner.
Kay,
5 days ago
Verified
Accurate and speedy..
Reasonable prices and speedy delivery.
Mr Alex Whitehill,
5 days ago
Verified
Packed well to prevent any damage to…
Packed well to prevent any damage to corners etc.
Still covered with their protective film and cut exactly to my sizes - thank you
DB
David Bradshaw,
5 days ago
Verified
I need to create some jig templates for…
I need to create some jig templates for my router. The cutmy service delivered accurately the products ordered to the agreed measurements. Overall the service exceeded my expectations.
Stephen,
5 days ago
Verified
Thank you great product swift delivery…
Thank you great product swift delivery .
Easy to install ????????
Harry Jonas,
5 days ago
Verified
Easy to order
Easy to order. Measuring guide very useful and the acrylic panels fit perfectly for Air Conditioning Vent.
Cherry Salvesen,
5 days ago
Verified
A Product that does what is says on the tin!
Easy to order, keep informed of progress of the order, prompt delivery.
Phil,
5 days ago
Verified
Good service delivered without fuss
Relatively quick turnaround. Prices seem marginally cheaper than other places though not much in it. Delivery was next day once cut. Works perfectly as a cover for my windows frame to vent my portable a/c hose.
Mark Gill,
5 days ago
Verified
Great service!
Great service!
Mr Walker,
5 days ago
Verified
Custom cut acrylic panel - great company to do business with.
Custom acrylic panel to accommodate air conditioning unit hose
Easy to navigate and use website
Simple ordering process with easy customisation
Fair price & great to have a click and collect option for those who are local
Good quality product which does exactly what is needed.
Sarah England,
5 days ago
Verified
Cut exactly to size
Cut exactly to size. Saved me a lot of work. Awesome service.
Nick Cordingley,
5 days ago
Verified
Perfect
Cut exactly to size ready to go and reasonably quick delivery. Perfect for me, am sure to use again.
Brentatryedale,
5 days ago
Verified
Promptly delivered wood cut correctly…
Promptly delivered wood cut correctly to exact size - great service. Will use agin.
WCA LLP,
6 days ago
Verified
Great service quite exactly to my…
Great service quite exactly to my measurements and delivered very quickly first class five star
B A Hulks,
6 days ago
Verified
Exactly as described and packaged great
I ordered two shelves out of MDF to my custom measurements and they came exactly as described. The packaging for shipping was great and ensured there was no damage to them. I'll be using them again when I need something cut.
A Fordy,
6 days ago
Verified
Competitively priced good quality
Competitively priced, Produced exactly to my specifications and well packed for safe delivery.
AJ,
6 days ago
Verified
Always nice when a supplier does…
Always nice when a supplier does exactly what it says on the tin..
I had some perspex panels printed to finish off a 3D printed project and just give it that extra polish.
They arrived spot on, to the mm.
Ian Lowe,
6 days ago
Verified
Perfect Product
Very easy website to use. I needed a new oak coffee table top. I entered the dimensions, picked to get it lacquered. It arrived 3days later. Perfect,no messing around. I fitted it the same day.
Simon,
6 days ago
Verified
Happy customer
No issues, lots of communications with order status and product delivered in great condition
Kat B,
6 days ago
Verified
Excellent - Efficient and Great Value
Instructions online were great. Ordering was efficient and the communication throughout the process was outstanding. We received the items, instructions and tools to put up our perspex glass with the aircon space which fitted perfectly.
Honestly it has been a game changer. The air conditioning fitting through the gap keeps the cool air in, and the hot air out. In this hot climate, I'm extremely thankful for the CutMy team and that they got the product just at the right time!
p.s. I've already recommended your service to others Thank you so much.
Nana Fifield,
6 days ago
Verified
Very professional sales team
Very professional sales team, polite and friendly aiming to give the customer the best service. Customer experience was excellent, with Megan did what she said she was going to do. Refreshing in this day of computer driven outcomes.
Thank you very much
David ,
6 days ago
Verified
Great service
Great service
Heather Liley,
6 days ago
Verified
Easy to use website & good quality…
Easy to use website & good quality product. When delivered item was packaged well. This has made a big difference/efficacy to air con. Highly recommended & thank you
Deborah Warrener,
6 days ago
Verified
Prompt delivery and a good product
Prompt delivery and a good product, thank you.
William Kerr,
6 days ago
Verified
It’s was the perfect precise size and…
It’s was the perfect precise size and well packsged
Mr I Geddes,
6 days ago
Verified
Prompt and efficient with product as described
As I expected. Spot on.
David,
6 days ago
Verified
Great service and price
Ordered a bespoke size and was delivered as per spec. Simple and easy - would use again.
Emma,
6 days ago
Verified
It was great
It was great. Just too pricey. For something this expensive you could offer free delivery at least. The quality of the order was amazing. But just wish didn't have to pay too much
Ashar,
6 days ago
Verified
Delivered on time ,well package and…
Delivered on time ,well package and exact measurements
keila samanta,
6 days ago
Verified
Cut exactly to sizes required and…
Cut exactly to sizes required and delivered within a few days, in excellent quality packaging.
Steve,
6 days ago
Verified
Very good service,prompt delivery and…
Very good service,prompt delivery and measurements were very accurate. Would recommend anytime.
Sharon ,
6 days ago
Verified
High quality
Accurate, quick, good quality, good value
Linda,
6 days ago
Verified
They just do a great job
They just do a great job. Wide range of options and quick delivery.
Eileen Preston,
6 days ago
Verified
Second time using them
Second time using them. Very good service. Quick postage and quality product
Michael Collins,
6 days ago
Verified
Highly recommended
Absolutely spot on!!!
Highly satisfied with the size and material quality
Well packed.
customer,
6 days ago
Verified
The service was first class order was…
The service was first class order was exactly what I asked for and delivery was prompt and delivered with care
Miss Thwaites,
6 days ago
Verified
Great product
Great product, exactly as ordered.
Colin Leary,
6 days ago
Verified
The wood was fine
The wood was fine. The delivery service i will rate as 1 as it was left outside in the pouring rain. Was not happy.
Justine Helps,
6 days ago
Verified
Easy website
Easy website, rapid delivery
simon harrod,
6 days ago
Verified
Good quality with fast delivery
Good quality with fast delivery - highly recommended
Lorraine G,
6 days ago
Subscribe to our email newsletter
Sign up here for our occasional email newsletter with new products, design ideas and discounts across our huge and growing range of products. (You can unsubscribe at any time of course.)