The store will not work correctly when cookies are disabled.
Cookie Preferences
We use cookies and similar technologies to enhance your experience and ensure smooth order processing and to improve our website by analysing visitor behaviour or personalise content and show relevant offers.
Essential cookies are required for the site to function and cannot be disabled. By clicking "Accept" you agree to all cookies, including analytics and marketing. To decline non-essential cookies, click "Decline".
How to Measure a Splashback (The Ultimate Step-by-Step Guide for a Perfect Fit)
Knowing how to measure a splashback correctly is the most important step before ordering acrylic, glass or aluminium splashback panels. Whether you're renovating a kitchen or adding a modern feature behind the hob, accurate measurements ensure your splashback fits perfectly, lines up with your sockets, and installs without gaps or trimming.
This complete guide walks you through every measurement you need, from standard rectangular panels to more complex layouts with cut-outs, corners and extractor hoods. No previous DIY experience is required, just a tape measure and a few minutes.
Why Getting Your Splashback Measurements Right Matters
Ordering a splashback cut to the wrong size can result in:
Visible gaps
Edges that don't align with cabinets
Socket plates that won't sit flat
A panel that simply won't fit the space
Most splashbacks are custom-cut, so mistakes can be costly. Following this guide will help you get measurements accurate to the millimetre, ensuring a smooth installation and a professional finish.
What You Need Before You Start
To measure a splashback accurately, gather:
Tape measure (preferably a metal one for accuracy)
Pencil and notepad
A simple sketch of your splashback area to note measurements on
Step 1: Inspect the Splashback Area
Before taking measurements, look closely at the space:
Check for:
Uneven walls (common in older homes)
Worktops that slope or bow
Tiles with protruding edges
Sockets or controls that interrupt the space
Cooker hoods at different depths
Wall units that are slightly off level
Because very few walls are perfectly straight, it’s essential to measure in multiple places.
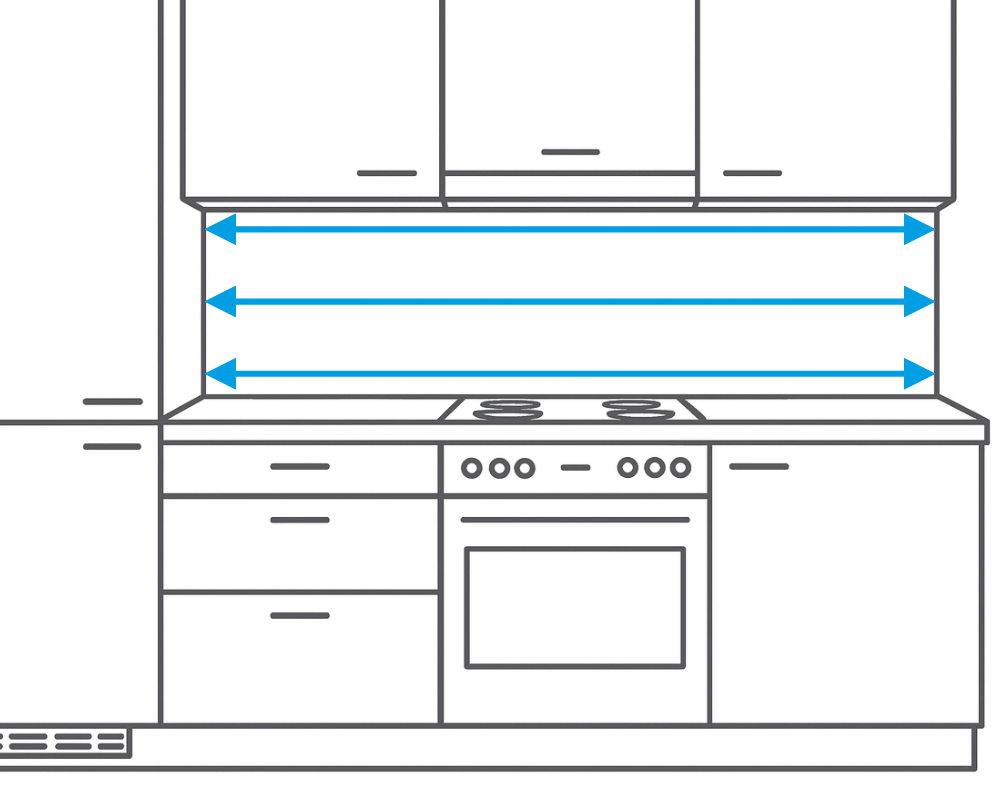
Step 2: Measure the Width
Width is one of the most important measurements when ordering a splashback.
How to measure the width:
Measure the full width along the worktop where the splashback will sit.
Measure again halfway up the wall.
Take an extra measurement just below the cabinets.
Use the smallest measurement — this prevents tight spots caused by uneven walls.
Important: If your wall bows inwards, the smallest measurement ensures the splashback fits into the narrowest part.
Measure in three places and take the smallest measurement
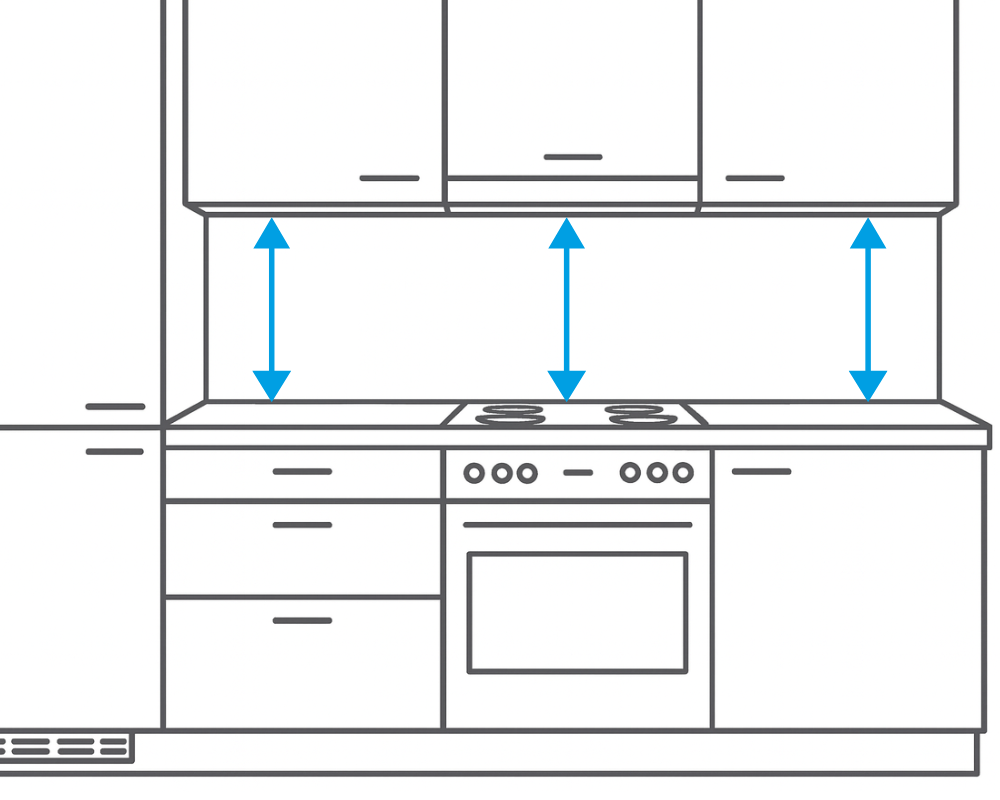
Step 3: Measure the Height
Next, measure the height of the splashback area.
How to measure splashback height:
Measure from the worktop to the underside of the wall units
If there are no wall units, measure to your desired height (e.g., 600mm or full height to extractor)
Measure at two or three points
Use the smallest number
Measure in three places and take the smallest measurement
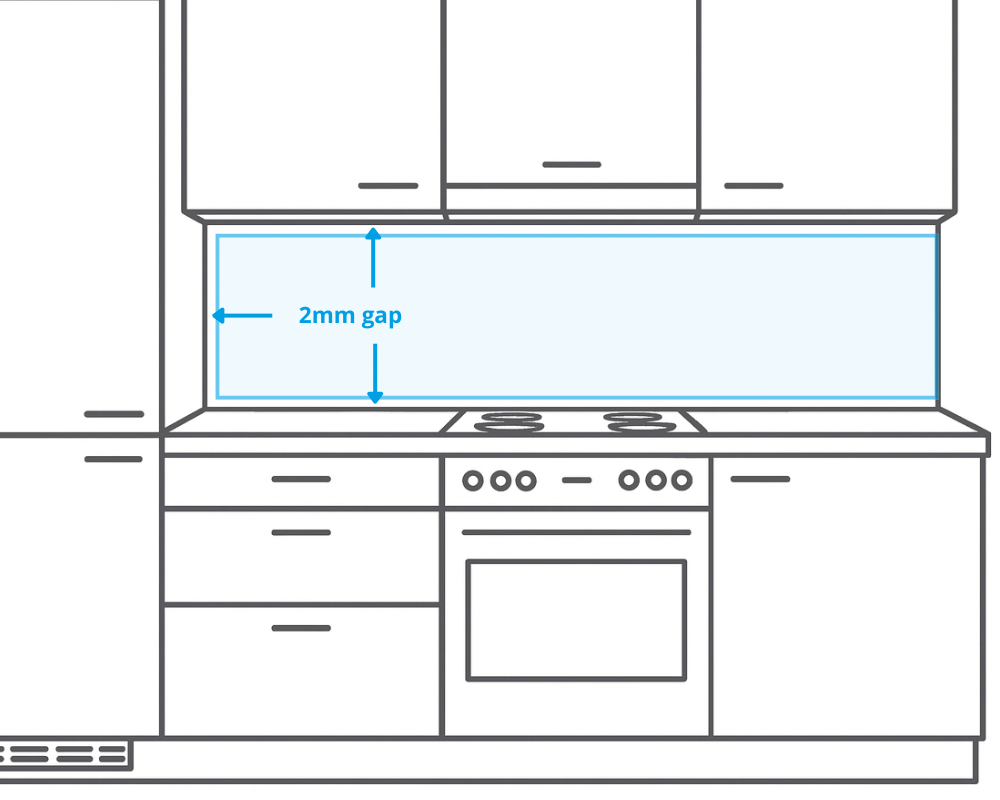
Step 4: Expansion allowance
Minus 2mm from every side of the splashback that meets a wall or object.
Why is this important?
When measuring, it’s important to allow for natural expansion. Splashbacks, worktops and cupboards can all expand in heat. If a splashback is fitted too tightly, without any room to expand, it can press against surrounding surfaces and eventually crack.
To prevent this, we advise leaving a 2mm expansion gap on every edge where the splashback meets a wall, cabinet, or any other fixed object. This small allowance ensures the panel can expand safely and maintain a perfect fit over time.
Minus 2mm where the splashback meets a wall or object
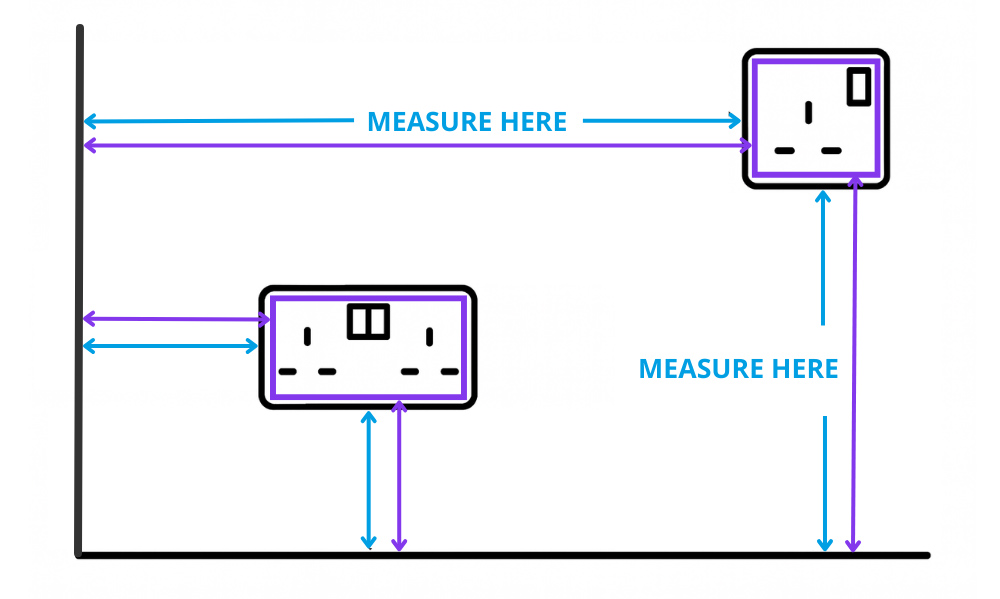
Step 5: Measuring Around Sockets, Switches & Obstacles
Most kitchens have multiple sockets along the worktop, so accurate cut-out measurements are essential.
You need to record:
Height and width of the socket - minus 10mm (a standard double is 145 x 85mm, standard single is 85 x 85mm, so your socket size would be 135 x 75mm or 75mm x 75mm)
Horizontal distance from the left wall or edge of the splashback (Offset Left) - plus 5mm
Vertical distance from the worktop to the bottom of the socket (Offset Bottom) - plus 5mm
FINAL MEASUREMENT: Minus 10mm from socket size and add 5mm to offset left and bottom to make sure the splashback sits behind the socket faceplate.
Repeat for:
Double sockets
Fused spurs
Cooker switches
Isolation switches
Ethernet or USB ports
Control boxes (boilers, hobs, etc.)
Step 6: Measuring a Splashback Behind a Hob or Extractor
Whether you have a gas hob, induction hob, or an angled extractor hood, the process is similar.
How to measure this area:
Measure from the hob surface to the bottom of the extractor
If installing a full-height splashback, measure from the worktop to the extractor
Take two or three measurements and choose the smallest
If the extractor widens at the bottom, measure the narrowest point
Step 7: Measuring L-Shaped, U-Shaped, or Multi-Section Splashbacks
If your splashback needs to cover more than one wall or an area with corners, divide it into sections.
How to measure complex splashbacks:
Break the area into simple rectangles
Measure each rectangle separately
Mark where the joins or corners meet
Note all socket positions relative to each individual section
You do not need to draw a perfect diagram — just a clear sketch. We have several splashback templates you can download and print for some simple shapes.
How to Measure Splashbacks for Internal Corners (Butt Joints & Overlap Joints)
Measuring an internal corner can look complicated, but once you understand how each joint works, the process becomes very straightforward. Internal corners are fitted using either an overlap joint or a butt joint, and the measurements differ slightly depending on which method you use.
Below is a simple explanation of both methods — including exactly what you need to deduct for a perfect, tight-fitting corner.
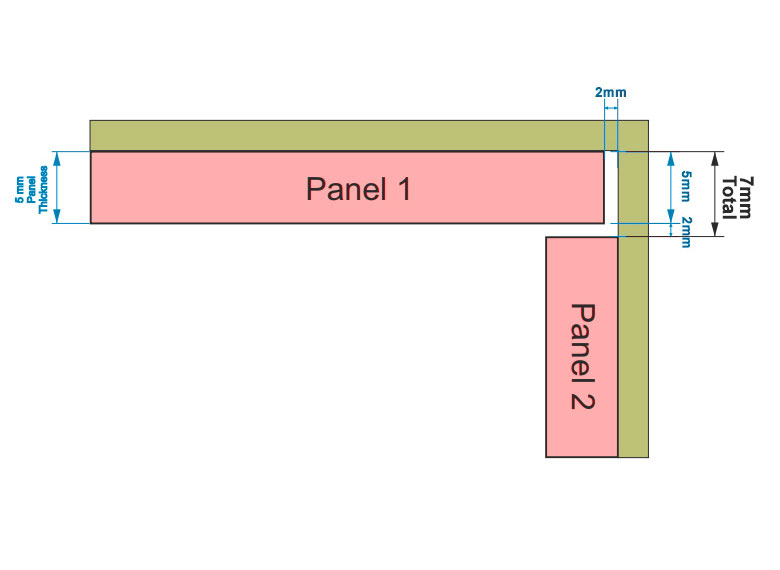
Option 1: Overlap Joint (Panel Over Panel)
An overlap joint is where one splashback panel slightly overlaps the edge of the next panel. This method is ideal if you want to reduce visible silicone lines and create a cleaner internal corner.
How to Measure for an Overlap Joint
Measure the full width of your first panel section.
Deduct a 2mm expansion gap (for acrylic or composite panels).
Now deduct:
The full thickness of the second panel, plus
An additional 2mm to ensure the overlap sits comfortably and doesn't force the panels apart.
This gives you the correct finished width for the first panel, so it sits neatly behind the second.
Why choose this method?
Minimal silicone needed
Cleaner corner appearance
Great for modern, seamless installations
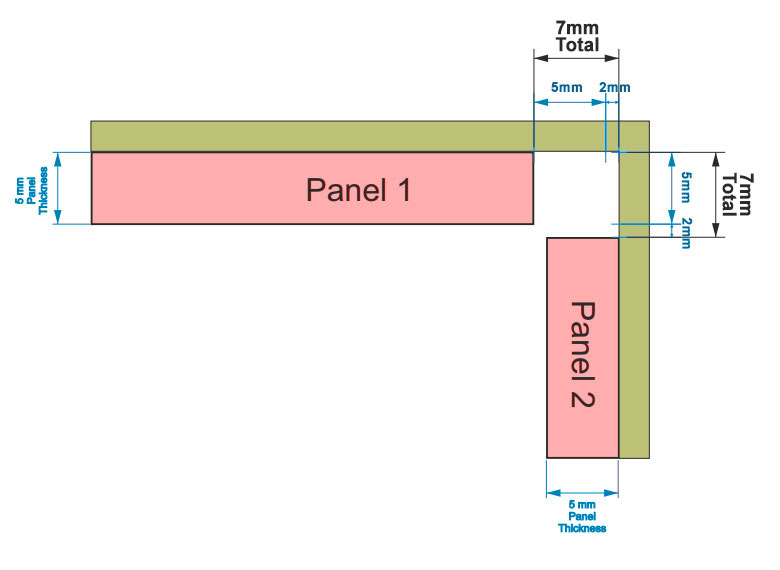
Option 2: Butt Joint (Panels Meet in the Corner)
A butt joint is where both panels meet flush in the corner — edge to edge. This method is commonly used with corner trims and gives more flexibility during installation.
How to Measure for a Butt Joint
For each panel:
Start with your full panel width as measured.
Deduct the panel thickness from the edge that will sit in the corner.
Allow a 2mm expansion gap.
Repeat the same calculation for the second panel that meets it in the corner.
This ensures both panels sit comfortably within the corner without forcing or bowing.
Why choose this method?
Works perfectly with corner trim profiles
Allows easier adjustment when fitting
Silicone can be used to create a smooth, flexible join
Finally: Double-Check All Measurements
Before placing your order, check:
Have you used mm, not cm?
Have you recorded the smallest width and height?
Have you allowed for expansion (if required)?
Have you added 5mm overlap to socket measurements?
Are your cut-out positions clearly marked?
Frequently Asked Questions
How do you measure a splashback accurately?
Measure width and height in several places in millimetres, use the smallest measurement, and record socket positions carefully. Repeat and check your measurements.
What is the standard height for a kitchen splashback?
Most splashbacks are 600mm high, but you can measure from worktop to cabinets or choose a custom height.
How much clearance do you need for sockets?
Add 5mm extra around each socket cut-out so the splashback sits neatly behind the faceplate.
Do I need to account for expansion?
Splashbacks require a 2mm expansion gap.
Can I measure my own splashback or do I need a professional?
Most people can measure their own splashback using a tape measure. Only highly complex shapes may benefit from templating.
Final Checklist: Your Splashback Measurement Summary
Measure width at several points → use smallest
Measure height at several points → use smallest
Reduce by 2mm for expansion
Measure all socket positions and sizes
Add 5mm overlap for socket cut-outs
Sketch each section clearly
Double-check everything in millimetres
With these steps, you'll be able to order a splashback that fits perfectly the first time.
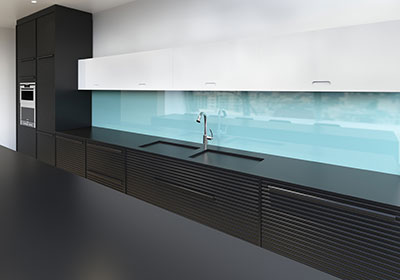
Ready to Buy Your Splashback?
We have over 70 styles and colours to choose from. Whether you want a glossy acrylic splashback, a luxury glass one or a contemporary brushed look we can help.
They would got 5 stars had my order not taken so long to arrive
Paul Hill,
1 hour ago
Verified
Product as described and super prompt…
Product as described and super prompt delivery.
AJ,
3 hours ago
Verified
Great customer service.
Great customer service.
Anon,
5 hours ago
Verified
Quick and efficient and competitive on…
Quick and efficient and competitive on price
J fowler,
5 hours ago
Verified
Perspex sheet
The service was excellent delivery very prompt definitely buy again
Kevin Lockwood,
6 hours ago
Verified
Arrived within few days
Arrived within few days, fit perfectly, and was very pleased. Will definitely use you again in the future.
Mary Renfree,
22 hours ago
Verified
5 stars if delivery company hadn't lost my order
I eould have given a 5, but I ordered and my goods were out for delivery and got lost by the delivery company. I did get a response straight away to my initial query that it was with the delivery company. When it still didn't arrive I recontacted CutMy again and this time Charlie looked into it and reprocessed my order and it came properly. Probably much quicker than going elsewhere.
Otter,
1 day ago
Verified
Great service and quick delivery
Great service and quick delivery
Julie Horan,
1 day ago
Verified
Brilliant service
Easy ordering and quick delivery. Item is just perfect, thank you
Mrs Melanie Hodgson,
1 day ago
Verified
Excellent service. …
I have nothing but praise for this company, my plywood order was to my exact measurements and it was well packaged. I thoroughly recommend their services.
Mr Shilling,
1 day ago
Verified
Prompt delivery and items cut to exact…
Prompt delivery and items cut to exact size required and great value for money.
Guest,
1 day ago
Verified
Accurate cutting material supplied…
Accurate cutting material supplied arrives well packaged and in a decent condition and in a reasonable delivery time
Nicholas,
1 day ago
Verified
Excellent company to deal with.
Website is easy to manoeuvre, provides good instructions and goods are cut and delivered swiftly plus great communication from delivery company. Quality of the oak veneered mdf is first class, perfect for the wall mounted headboard I am using it for and worked out as a third of the price I would have needed to pay for an equivalent ‘off the shelf item.
sheila murphy,
1 day ago
Verified
Good quick service.Thank you.
Good quick service.Thank you.
Steven Hadfield,
1 day ago
Verified
The acrylic panel fitted perfectly
The acrylic panel fitted perfectly. Thank you very much.
Susan,
1 day ago
Verified
Easy to place order
Easy to place order
Sara,
1 day ago
Verified
The wood was packed for delivery to a…
The wood was packed for delivery to a high standard. It was better than my bathroom units. Thank you for your high standards
Jonathan,
2 days ago
Verified
I needed an additional shelf in two of…
I needed an additional shelf in two of my kitchen cupboards and this company provided just that. Perfectly cut and finished.
London customer,
2 days ago
Verified
Good job
The cut sheets I needed were exactly as specified, quickly delivered and securly packaged.
Andy,
2 days ago
Verified
Sent the size i needed and it was cut…
Sent the size i needed and it was cut perfect to size,I highly recommend using this place for sure!.
Gary Thompson,
2 days ago
Verified
They would got 5 stars had my order not…
They would got 5 stars had my order not taken so long to arrive
Paul Hill,
1 hour ago
Verified
Product as described and super prompt…
Product as described and super prompt delivery.
AJ,
3 hours ago
Verified
Great customer service.
Great customer service.
Anon,
5 hours ago
Verified
Quick and efficient and competitive on…
Quick and efficient and competitive on price
J fowler,
5 hours ago
Verified
Perspex sheet
The service was excellent delivery very prompt definitely buy again
Kevin Lockwood,
6 hours ago
Verified
Arrived within few days
Arrived within few days, fit perfectly, and was very pleased. Will definitely use you again in the future.
Mary Renfree,
22 hours ago
Verified
5 stars if delivery company hadn't lost my order
I eould have given a 5, but I ordered and my goods were out for delivery and got lost by the delivery company. I did get a response straight away to my initial query that it was with the delivery company. When it still didn't arrive I recontacted CutMy again and this time Charlie looked into it and reprocessed my order and it came properly. Probably much quicker than going elsewhere.
Otter,
1 day ago
Verified
Great service and quick delivery
Great service and quick delivery
Julie Horan,
1 day ago
Verified
Brilliant service
Easy ordering and quick delivery. Item is just perfect, thank you
Mrs Melanie Hodgson,
1 day ago
Verified
Excellent service. …
I have nothing but praise for this company, my plywood order was to my exact measurements and it was well packaged. I thoroughly recommend their services.
Mr Shilling,
1 day ago
Verified
Prompt delivery and items cut to exact…
Prompt delivery and items cut to exact size required and great value for money.
Guest,
1 day ago
Verified
Accurate cutting material supplied…
Accurate cutting material supplied arrives well packaged and in a decent condition and in a reasonable delivery time
Nicholas,
1 day ago
Verified
Excellent company to deal with.
Website is easy to manoeuvre, provides good instructions and goods are cut and delivered swiftly plus great communication from delivery company. Quality of the oak veneered mdf is first class, perfect for the wall mounted headboard I am using it for and worked out as a third of the price I would have needed to pay for an equivalent ‘off the shelf item.
sheila murphy,
1 day ago
Verified
Good quick service.Thank you.
Good quick service.Thank you.
Steven Hadfield,
1 day ago
Verified
The acrylic panel fitted perfectly
The acrylic panel fitted perfectly. Thank you very much.
Susan,
1 day ago
Verified
Easy to place order
Easy to place order
Sara,
1 day ago
Verified
The wood was packed for delivery to a…
The wood was packed for delivery to a high standard. It was better than my bathroom units. Thank you for your high standards
Jonathan,
2 days ago
Verified
I needed an additional shelf in two of…
I needed an additional shelf in two of my kitchen cupboards and this company provided just that. Perfectly cut and finished.
London customer,
2 days ago
Verified
Good job
The cut sheets I needed were exactly as specified, quickly delivered and securly packaged.
Andy,
2 days ago
Verified
Sent the size i needed and it was cut…
Sent the size i needed and it was cut perfect to size,I highly recommend using this place for sure!.
Gary Thompson,
2 days ago
Subscribe to our email newsletter
Sign up here for our occasional email newsletter with new products, design ideas and discounts across our huge and growing range of products. (You can unsubscribe at any time of course.)