The store will not work correctly when cookies are disabled.
Cookie Preferences
We use cookies and similar technologies to enhance your experience and ensure smooth order processing and to improve our website by analysing visitor behaviour or personalise content and show relevant offers.
Essential cookies are required for the site to function and cannot be disabled. By clicking "Accept" you agree to all cookies, including analytics and marketing. To decline non-essential cookies, click "Decline".
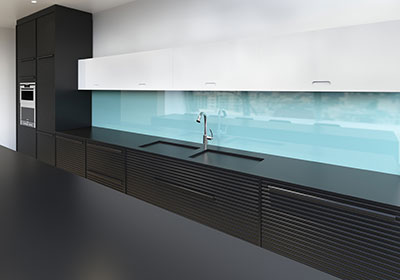
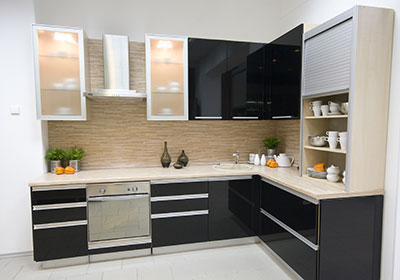
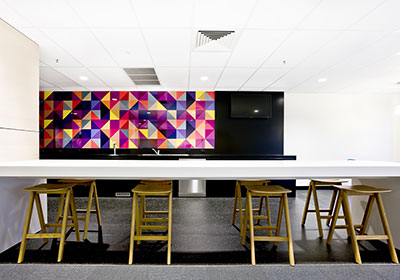
Once the area for your splashback has been measured and you have taken delivery of your cut to size splashback, installation is the final step of the process. While it may be daunting, particularly for those new to DIY projects, you’ll be surprised at how easy it is and how quickly it can be fitted into place.
Before you get started, consider the following:
Please note, before considering cutting your splashbacks, you cannot cut any of our Premium Acrylic or Premium Glass Splashbacks. If you require it cut to your specifications, please contact us prior to ordering.
Don’t install acrylic or aluminium composite panels behind a gas or electric hob. If you have an induction hob, maintain a 50mm gap between the hob and your acrylic splashback, and a 150mm gap for aluminium composite.
Where a direct heat source is present, such as with a gas hob, you should opt for a glass splashback instead of acrylic.
Because of the temperature variations in kitchens and bathrooms, the panels will expand and contract slightly, so they should always be installed with a 2mm gap to allow for this movement.
If you’re storing your splashback for any length of time, try not to do so outside or in extreme temperatures as this can cause the panel to bend or distort. Make sure the panels are stored flat.
If you’re installing the panels over existing tiling, check that the tiles aren’t loose or cracked as this can lead to the splashback not adhering properly to the wall or distortion of the final result.
If you are using adhesive, please use a non-solvent one to avoid damage to acrylic.
Use a low modulus silicone adhesive when fitting your splashback and allow a minimum of 24 hours for the silicone to cure before carrying out any further work on your splashback.
Ensure that the walls or surface behind the splashback is sealed and non-porous, sealing any boarding panels as well.
Preparing the splashback for installation
If you have chosen to cut your own cutouts, please follow the instructions below. Make sure you keep the protective film on the acrylic until the last moment.
Mark out the area to be drilled or cut
Before you drill or cut your panel, make sure you’re wearing appropriate eye protection and thick gloves as the sides of the panel may be sharp. Make sure that you’re marking the panel in the same environment as where the panel will be fitted, as expansion or contraction from different temperatures might affect the final size of the panel. Mark out the area using a soft felt-tipped pen but be careful not to scratch or scribe the panel itself. You can use masking tape to avoid this. Double check your measurements before carrying out any work to be extra sure you’re drilling the correct area.
Cutting your splashback panel
When cutting holes for power sockets or other small cut-outs, always use a drill and don’t allow the blade to overheat as this can cause the acrylic to melt. Always use a sharp and appropriate blade to avoid the material from chipping and cut at a steady speed and pressure, cleaning the swarf away regularly so as not to damage the panel. Ensure the panel is firmly fixed to a table or work platform using soft grip C clamps to reduce the vibrations. Be sure to have a piece of scrap wood or ply behind the acrylic to relieve the pressure on the plastic, which should minimise chipping and cracking. We recommend using a professional who has previously worked with acrylic splashbacks to make any alterations. The best tool to us is a router failing that a track saw with an appropriate blade for acrylic. If using a saw the cut should be made from the rear to avoid the protective lifting and damaging the print.
Please note that if you are attempting to cut the splashback yourself we are unable to accept any claims for damage.
Drilling your splashback panel
Once you’ve ensured the markings are in the correct place, you can begin drilling using a good quality HSS drill bit. Make sure there is a wooden block underneath to dril into, which should prevent any splitting or cracking. Larger holes drilled close to the edges of the panel can reduce the rigidity and strength of the panel overall, and could result in damage to the acrylic, so we don’t advise drilling holes any closer than 20mm from any edge.
To begin, drill a small pilot hole to be completely sure the placement is correct then slowly build the size using slightly larger drill bits until the required diameter is achieved. We recommend supporting your panel on a table or work platform using soft grip C clamps so that the risk of bending or breaking is reduced and apply only a light pressure when drilling. Make sure there is a wooden block underneath to drill into, which should prevent any splitting or cracking. For a secure fit, drill a clearance hole through the panel and then fix the item to the wall behind – don’t use screws to fix items to the panel. When drilling through the acrylic, always drill into something behind it to avoid the protective vinyl pealing away from the acrylic.
Finishing the edges of your splashback
Acrylic can be sharp when cut, so it’s important to finish the edges with medium grit sandpaper or a file, then finish off with a finer grit sandpaper to smooth the surface and make it safer to work with. Avoid sanding the front of the panel as this can lead to scratches and abrasions – a sanding block is the best tool for the job to achieve an even finish.
Installing the splashback
Please note that our pastel acrylic splashbacks are double sided with a gloss finish on one side and matt on the other. Both sides will have a protective film to reduce to risk the of scratches, but the Perspex branding and logos should be on the side with the matt finish so please verify this before peeling the films and installing.
Installing over existing tiled walls
Splashbacks can be installed over existing tiles, providing they’re securely attached to the wall and there are no cracks or broken tiles which might impact the adhesion of the panel. Make sure the tiles are level with no high spots and remove any uneven tiles which might distort the final surface of the splashback. You should also check the tiles have been thoroughly degreased, cleaned and dried before fitting the panel as per the instructions below. Any exposed tile edges can then be finished with silicone or finishing trims.
Steps to installing your splashback
Check the surface the panel is being fitted to is clean and free from dirt, dust, grime, loose paint and wallpaper.
If your splashback has come with vinyling, do not remove this. You will know if there is a vinyl backing as it will have a blue "do not remove" sticker on it.
If you have purchased a painted acrylic or glass splashback, the painted side should be attached to the wall ensuring that the clear, glossy side faces outward. This not only protects the painted surface but also creates a smooth, easy-to-clean finish.
Test fit the splashback by ensuring there is room for movement and expansion around the sides of the panel.
Apply beads of low modulus silicone sparingly in wavy lines across the panel, ensuring there’s an even coverage and that there’s a bead of silicone around the aperture for any cut-outs or holes. Make sure the silicone is not too close to any edges
Using spacers under the panel to allow for the expansion gap, guide the bottom of the panel to the correct part of the wall and move the top of the panel towards the wall, applying firm pressure to fix it into place
Apply pressure firmly with your hands across the whole of the panel to make sure it’s securely fastened and that the panel has decent contact with the wall
Wait 24 hours to allow the silicone to cure before removing the spacers
Use masking tape to mask the edges of the panel and then seal the expansion gaps using an appropriate sealant, removing the excess with a silicone finishing tool and smoothing with a mild solution of soap and water
Once the edges are smoothed, you can remove the masking tape, making sure the room is well ventilated to allow the sealant to dry properly
Remove the other protective film from the front of the acrylic
Cleaning your splashback
Cleaning acrylic splashbacks is incredibly easy – it can be done using just a soft cloth and warm, soapy water. Don’t use scouring pads or chemical cleaners and never rub the panel if the surface is dry, as this can scratch the panel. If you need to remove silicone or stronger substances from the splashback, a small amount of Turpentine on a lint-free cloth usually does the job.
Our Sample Service
Order a sample of any of our products before you buy to make sure the colour is exactly what you're looking for
Everything we expected in quality was present and the well-organised order went without a hitch.
SUSAN TREVELYAN-SYKE,
1 hour ago
Verified
Excellent product and delivered within…
Excellent product and delivered within time. I made a mistake with sizes and this was easily fixed by Cutmy.
Mr Deveney,
2 hours ago
Verified
I wanted some shelving to match a worktop.
I wanted some shelving to match the worktop style in our utility cupboard. I also wanted it cut to specific sizes to fit the twin slot layout I had planned.
I was not disappointed, the shelving was cut to the exact sizes and of good quality.
There was also the personal touch of contacting me to check that I wanted to collect the shelving at their workshop rather than have it delivered given the distance I would be travelling.
customer,
2 hours ago
Verified
Excellent Service
This was my 2nd order very happy, panelling was all cut to correct size was given good instructions and delivery was very quick. Would definitely recommend
Gillian Littlejohn,
2 hours ago
Verified
Good value delivered quickly
Good value delivered quickly
Leslie Walker ,
3 hours ago
Verified
A little nervous
Never done this before so a little nervous. Needed 6 doors , plinth and a piece to cut for infill under sink so decided to order 1 door first to make sure right size and hinge holes in right place. Order delivered and fitted perfectly even though slightly different in size to the standard. Ordered remaining pieces and all fitted perfectly and all looks great at a good price and experience better than expected.
Tony Adams,
4 hours ago
Verified
Really easy to order
Really easy to order, quick delivery and great product
fatma,
5 hours ago
Verified
Good quality
Good quality, delivered as stated.
Allan Morrison,
6 hours ago
Verified
Wall panelling project
Easy web site for ordering
Products came delivered well packaged
M. Compton,
6 hours ago
Verified
Dado rail panelling.
Did some dado rail panelling.
Having shopped around i ordered from my cut and got it cut and mitred to sized perfecly from cheaper than most places supplied in lengths.
Will definitely use again
Excellent service
Chris Watson,
6 hours ago
Verified
Good quality, quick delivery
I ordered two plain white shelves from Cut My. They were delivered within a few days and the quality is really very good, much better than I had expected
Pauline,
7 hours ago
Verified
Excellent quality and very happy
Ordered Perspex plates only 2mm thick at quite a small size, a few were slightly damaged on arrival due to postage. Customer service got back to me right away, refunded me the small amount for the damaged plates, which was a nice a gesture and much appreciated! The quality of the plates was excellent and I was extremely happy with my order.
Look forward to using this company again!!
Thomas Hulme,
15 hours ago
Verified
Good customer relations
Good customer relations, excellent service and a reliable company
customer,
15 hours ago
Verified
Delivery was prompt and goods were well…
Delivery was prompt and goods were well protected/packaged when received, so no damage during transit. Very happy with the product and overall service…
Paul Hibbert,
18 hours ago
Verified
Perfectly finished
Perfectly finished. Exactly what i wanted and a really speedy dispatch.
C Giles,
19 hours ago
Verified
Easy to order
Easy to order. Good value product. Quick delivery.would definitely use again and recommend.
Angela McAulay,
19 hours ago
Verified
Quality
I ordered made to measure acrylic for a project it was perfect came all wrapped and protected so no scratches it's so easy to order just pick your thickness and give your measurements it's so easy they do vast array of products cut to size I will definitely use this company again
Different crafts,
19 hours ago
Verified
Fantastic
Great service. Easy to use website. Quick delivery. Item was exactly as described and well packed. All in all a great company. Thank you.
Mrs Victoria Crane,
19 hours ago
Verified
Excellent
Excellent ! Very happy with the wardrobe! Recommend
Vadzim ,
20 hours ago
Subscribe to our email newsletter
Sign up here for our occasional email newsletter with new products, design ideas and discounts across our huge and growing range of products. (You can unsubscribe at any time of course.)