The store will not work correctly when cookies are disabled.
Cookie Preferences
We use cookies and similar technologies to enhance your experience and ensure smooth order processing and to improve our website by analysing visitor behaviour or personalise content and show relevant offers.
Essential cookies are required for the site to function and cannot be disabled. By clicking "Accept" you agree to all cookies, including analytics and marketing. To decline non-essential cookies, click "Decline".
James Bryant is the Founder of Cut My, an online retailer providing quality materials for home improvement and DIY projects. An avid DIY enthusiast himself, James started Cut My to share his passion for building and making things.
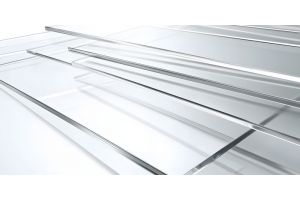
Adding mirrors to a room is a great way to add some light or depth to a room. With a multitude of uses, mirrored acrylic is fantastic to use both indoors and out, from the garden to a child’s playroom, with added safety features making it a preferred option to traditional glass mirrors.
While our self-installation guide is provided here, we recommend professional installation for optimal results.
We recommend that any mirrored acrylic sheets ordered above the size of 1m2 should be ordered to a minimum thickness of 5mm and will require a suitable backing, in order to provide a high-quality finish.
This guide will walk you through the process of backing large mirrored acrylic onto an MDF board, which will reduce distortion in the reflection of your mirror. Even newly built homes can have wonky walls, and although it looks smooth, it doesn't necessarily mean that it is flat. Because of this, we recommend putting larger sheets of mirrored acrylic onto an MDF backing to ensure a high-quality finish. To back your mirrored acrylic to equally high quality, we highly recommend a flat, strong board, such as our 18mm MDF.
Please be aware that any scratches to the reverse side of the mirrored acrylic will show in the reflection when fitted, so ensure you handle the product with care.
Prior to installation, test your non-solvent-based adhesive on a small area to avoid damaging the reflective surface. Alternatively, mechanically fixing with screws is an option. Remember to include fixing holes and mirror screws when placing your order.
Please be aware that using screws makes installation without distortion harder to achieve, particularly on larger sizes. For this installation guide, we will be using adhesives.
MDF Backing Board of the same measurements as your mirrored acrylic
Adhesive - Suitable options include BTF or Double Sided Tape. Please make sure that your adhesive is non-solvent based to avoid damaging the acrylic.
A Rubber Roller
How To Back Mirrored Acrylic
Lay backing material onto a flat surface, and mark with a pencil where you intend to back the mirrored sheet.
Apply your adhesive option onto the reverse (non-reflective) side of the mirrored acrylic sheet.
If using adhesive: Apply it generously but with a small bead along the surface of the MDF board. Remember, a thinner bead is better for a flush finish against the wall. Spread the adhesive evenly across the board in a zigzag pattern to ensure consistent coverage. If using double sided tape: Make sure to put this on in many places across the back of the mirror and not just the corners for even coverage.
Carefully align your mirrored acrylic sheet and your backing board together.
When aligned, sandwich the two together firmly making sure you are applying pressure evenly across each part of the board.
Use the rubber roller to gently smooth out any unevenness with the adhesive.
Allow to dry in a cool area.
Things To Note
Do not forget to peel off the protective film on the reflective surface
Once the mirrored acrylic is installed, we are unable to accept returns of the product - this does not affect your statutory rights
Please be aware that failure to follow our installation advice may cause distortion or warping of the product
We're Here to Help
Our Help Centre is available 24/7 to explore FAQs, discover DIY ideas and advice, and even ask our community of fellow DIY enthusiasts.
Ordering was simple and the technical view was very helpful.Wood cut precisely and good quality. It made me the job much easier than cutting yourself. Delivered on time. I was very pleased and would recommend.
Peter ,
21 hours ago
Verified
Excellent service and product
Excellent service both when ordering the samples and then the final product. Beautifully finished and exactly what we needed. Rang to ask a question and the assistant was knowledgeable and friendly.
Ellen Walker,
21 hours ago
Verified
Good service cut to size and delivered…
Good service cut to size and delivered promptly. Should have bought a thicker panel.
nicholas hardy,
22 hours ago
Verified
Easy ordering procedure.
Easy ordering procedure.
Wood arranged on time.
Good quality and measurements spot on.
Customer,
22 hours ago
Verified
Very quick delivery
Very quick delivery - a couple of missing shelves which were delivered the next day but communicated to me on the same day so I knew what was happening. Excellent quality and service - would definitely use again
Alison,
22 hours ago
Verified
Accurate cut, extremely well packaged.
Accurate cut, extremely well packaged.
Bill Petrie,
23 hours ago
Verified
Always a1 purchase
Always a1 purchase
tina hart,
1 day ago
Verified
Great product and customer service
Ordered 3 seperate desk tops (MDF with oak veneer) with holes pre drilled and the quality is excellent.
Slight delay with shipping due to delivery company, But cutmy refunded shipping.
John,
1 day ago
Verified
Excellent Customer Service and Product
Excellent product, easy to install, and fits perfectly. Great communication, excellent customer service, and fast delivery. Highly recommended!
Kim,
1 day ago
Verified
These guys know there stuff
These guys know there stuff, great customer service. Highly recommended
matthew marchant,
1 day ago
Verified
Easy ordering
Easy ordering, fast delivery and item was as expected
Miles,
1 day ago
Verified
Perfect solution for my portable air…
Perfect solution for my portable air conditioner.
Kay,
1 day ago
Verified
Accurate and speedy..
Reasonable prices and speedy delivery.
Mr Alex Whitehill,
1 day ago
Verified
Packed well to prevent any damage to…
Packed well to prevent any damage to corners etc.
Still covered with their protective film and cut exactly to my sizes - thank you
DB
David Bradshaw,
1 day ago
Verified
I need to create some jig templates for…
I need to create some jig templates for my router. The cutmy service delivered accurately the products ordered to the agreed measurements. Overall the service exceeded my expectations.
Stephen,
1 day ago
Verified
Thank you great product swift delivery…
Thank you great product swift delivery .
Easy to install ????????
Harry Jonas,
1 day ago
Verified
Easy to order
Easy to order. Measuring guide very useful and the acrylic panels fit perfectly for Air Conditioning Vent.
Cherry Salvesen,
1 day ago
Verified
A Product that does what is says on the tin!
Easy to order, keep informed of progress of the order, prompt delivery.
Phil,
1 day ago
Verified
Good service delivered without fuss
Relatively quick turnaround. Prices seem marginally cheaper than other places though not much in it. Delivery was next day once cut. Works perfectly as a cover for my windows frame to vent my portable a/c hose.
Mark Gill,
1 day ago
Verified
Great service!
Great service!
Mr Walker,
1 day ago
Verified
Custom cut acrylic panel - great company to do business with.
Custom acrylic panel to accommodate air conditioning unit hose
Easy to navigate and use website
Simple ordering process with easy customisation
Fair price & great to have a click and collect option for those who are local
Good quality product which does exactly what is needed.
Sarah England,
1 day ago
Verified
Cut exactly to size
Cut exactly to size. Saved me a lot of work. Awesome service.
Nick Cordingley,
1 day ago
Verified
Perfect
Cut exactly to size ready to go and reasonably quick delivery. Perfect for me, am sure to use again.
Brentatryedale,
1 day ago
Verified
Promptly delivered wood cut correctly…
Promptly delivered wood cut correctly to exact size - great service. Will use agin.
WCA LLP,
1 day ago
Verified
Great service quite exactly to my…
Great service quite exactly to my measurements and delivered very quickly first class five star
B A Hulks,
2 days ago
Verified
Exactly as described and packaged great
I ordered two shelves out of MDF to my custom measurements and they came exactly as described. The packaging for shipping was great and ensured there was no damage to them. I'll be using them again when I need something cut.
A Fordy,
2 days ago
Verified
Competitively priced good quality
Competitively priced, Produced exactly to my specifications and well packed for safe delivery.
AJ,
2 days ago
Verified
Always nice when a supplier does…
Always nice when a supplier does exactly what it says on the tin..
I had some perspex panels printed to finish off a 3D printed project and just give it that extra polish.
They arrived spot on, to the mm.
Ian Lowe,
2 days ago
Verified
Perfect Product
Very easy website to use. I needed a new oak coffee table top. I entered the dimensions, picked to get it lacquered. It arrived 3days later. Perfect,no messing around. I fitted it the same day.
Simon,
2 days ago
Verified
Happy customer
No issues, lots of communications with order status and product delivered in great condition
Kat B,
2 days ago
Verified
Excellent - Efficient and Great Value
Instructions online were great. Ordering was efficient and the communication throughout the process was outstanding. We received the items, instructions and tools to put up our perspex glass with the aircon space which fitted perfectly.
Honestly it has been a game changer. The air conditioning fitting through the gap keeps the cool air in, and the hot air out. In this hot climate, I'm extremely thankful for the CutMy team and that they got the product just at the right time!
p.s. I've already recommended your service to others Thank you so much.
Nana Fifield,
2 days ago
Verified
Very professional sales team
Very professional sales team, polite and friendly aiming to give the customer the best service. Customer experience was excellent, with Megan did what she said she was going to do. Refreshing in this day of computer driven outcomes.
Thank you very much
David ,
2 days ago
Verified
Great service
Great service
Heather Liley,
2 days ago
Verified
Easy to use website & good quality…
Easy to use website & good quality product. When delivered item was packaged well. This has made a big difference/efficacy to air con. Highly recommended & thank you
Deborah Warrener,
2 days ago
Verified
Prompt delivery and a good product
Prompt delivery and a good product, thank you.
William Kerr,
2 days ago
Verified
It’s was the perfect precise size and…
It’s was the perfect precise size and well packsged
Mr I Geddes,
2 days ago
Verified
Prompt and efficient with product as described
As I expected. Spot on.
David,
2 days ago
Verified
Great service and price
Ordered a bespoke size and was delivered as per spec. Simple and easy - would use again.
Emma,
2 days ago
Verified
It was great
It was great. Just too pricey. For something this expensive you could offer free delivery at least. The quality of the order was amazing. But just wish didn't have to pay too much
Ashar,
2 days ago
Verified
Delivered on time ,well package and…
Delivered on time ,well package and exact measurements
keila samanta,
2 days ago
Verified
Cut exactly to sizes required and…
Cut exactly to sizes required and delivered within a few days, in excellent quality packaging.
Steve,
2 days ago
Verified
Very good service,prompt delivery and…
Very good service,prompt delivery and measurements were very accurate. Would recommend anytime.
Sharon ,
2 days ago
Verified
High quality
Accurate, quick, good quality, good value
Linda,
2 days ago
Verified
They just do a great job
They just do a great job. Wide range of options and quick delivery.
Eileen Preston,
2 days ago
Verified
Second time using them
Second time using them. Very good service. Quick postage and quality product
Michael Collins,
2 days ago
Verified
Highly recommended
Absolutely spot on!!!
Highly satisfied with the size and material quality
Well packed.
customer,
2 days ago
Verified
The service was first class order was…
The service was first class order was exactly what I asked for and delivery was prompt and delivered with care
Miss Thwaites,
2 days ago
Verified
Great product
Great product, exactly as ordered.
Colin Leary,
2 days ago
Verified
The wood was fine
The wood was fine. The delivery service i will rate as 1 as it was left outside in the pouring rain. Was not happy.
Justine Helps,
2 days ago
Verified
Easy website
Easy website, rapid delivery
simon harrod,
2 days ago
Verified
Good quality with fast delivery
Good quality with fast delivery - highly recommended
Lorraine G,
2 days ago
Verified
Good product
Good product , very well packaged , good delivery service and unbelievable price . This is a genuine review honestly this company has got everything spot on buy with confidence.
bob,
2 days ago
Verified
Excellent all round experience.
User friendly website.Speedy delivery.Excellent all round experience.
Michael,
2 days ago
Verified
Precision Cut and Well Packaged
The mdf sheets were the exact size I requested and were extremely well packaged. Will use them again.
George Sewell ,
2 days ago
Verified
Perfect
Perfectly cut, sturdy material.
Natalie,
3 days ago
Verified
My Perspex sheet cut perfectly to size…
My Perspex sheet cut perfectly to size is fantastic.. so pleased with my colour choice, the quality and the customer service young lady who helped me place my order.
Vivienne,
3 days ago
Verified
It was great
It was great - the measurement was exact, the quality of the wood good, and it was really well packaged. It came really quickly too.
Katie Perrott,
3 days ago
Verified
Excellent all round, extremely happy each time!
I've ordered from Cut My 3 times now and couldn't be happier with the pieces, the price and the delivery speed. It's been so handy just ordering exact measurements so I can get jobs done myself without the hassle of buying a huge piece of shelving or MDF and making a mess cutting it etc. My last order was for moisture resistant MDF to box in a soil pipe that my husband kept promising to do. Well I've done it myself now and it literally took seconds with the made to measure pieces from Cut My and some connection blocks :)
Victoria Spain,
3 days ago
Verified
i received my order as per stated…
i received my order as per stated delivery time and i was given a call to confirm delivery time slot by the driver
Domonic brailey,
3 days ago
Verified
Everything was ok except delivery no…
Everything was ok except delivery no atttempt was made to use correct door with bell just said noone in which was not true just didn't use door bell
Sheila Birkby,
3 days ago
Verified
Good
Good, arrived in good time, as described
Mr Stuart Conchie,
3 days ago
Verified
Great service and quality
Great service. The order took slightly longer than expected due to the first order not passing their quality control. I was kept informed and when it arrived it was exactly what was ordered.
I would highly recommend Cut My
customer,
3 days ago
Verified
Brilliant service good quality and…
Brilliant service good quality and delivery
Jules,
3 days ago
Verified
Incredible service and brilliant…
Incredible service and brilliant product! Will 100% be ordering again
Alice Sanders,
3 days ago
Verified
Would highly recommend
Would highly recommend. Item was just as expected, well packaged and delivered on time.
Michelle Pickles,
3 days ago
Verified
Panel for air-con exhaust
Panel for air-con exhaust cut accurately and delivered promptly.
David Abrahams,
3 days ago
Verified
A Cut Above The Rest
Asked for a cut size and it was absolutely perfect to within 0.5mm and fitted my purpose beautifully.
Price very reasonable and delivered in a timely manner.
robert wilson,
3 days ago
Verified
simple to use
simple to use, visual plan was great. so simple to fit. looks amazing
DAVID STEVENS,
3 days ago
Verified
Good quality timber
Good quality timber - nice accurate cuts - delivered on time. I'll order some more soon!
John Terry,
3 days ago
Verified
Great service
Measurements perfect, well packaged for transport, easy to track delivery. Excellent service.
Ros Connolly,
3 days ago
Verified
Full marks!
This was the first time I'd used Cut My and I was very impressed, both by how cleanly and accurately they had cut my marine ply and by how well they had packaged it to avoid any damage in transit.
Huw,
4 days ago
Excellent product
Excellent product. I got a sheet of acrylic cut to size with a hole for an aircon vent. Easy to order and looks great now we’ve got it in place on our window.
I thought it might not look like real glass but it does.
Ian Maxwell,
4 days ago
Verified
Straightforward ordering
Straightforward ordering , process goid , delivery excellent
MARK PINNEY,
4 days ago
Verified
Excellent
Excellent! Good quality and fast delivery.
Mr White,
4 days ago
Verified
Absolutely perfect company to deal with…
Absolutely perfect company to deal with first class service and quality products .
Andy Angell ,
4 days ago
Verified
Very Good
Delivered on time and accurately cut to size
Peter Cottrill,
4 days ago
Verified
Brilliant service
Brilliant service. Ordered mdf cut to size and this fitted perfectly.
Sarah,
4 days ago
Verified
Great product and price
Great product and price, quick delivery
Robert Rees,
4 days ago
Verified
High Quality MDF Order
I needed a few precisely cut sheets of high quality MDF and that is just what was delivered.
PeaKay,
4 days ago
Verified
Exactly what I ordered
Exactly what I ordered, cut to size and ready for me to put to use.
Bonnie H.,
4 days ago
Verified
excellent 5mm splashback cut very…
excellent 5mm splashback cut very accurately
Elgin Lord,
5 days ago
Verified
Product exactly what I wanted
Product exactly what I wanted, perfect fit
debra Marland,
5 days ago
Verified
The marine ply was cut exactly how I…
The marine ply was cut exactly how I wanted it. Fast delivery.
Ian Bradford,
5 days ago
Verified
Fast efficient service
Fast efficient service
KEVIN CLIFFORD,
5 days ago
Verified
Fantastic delivery
Fantastic delivery
Cut to order
Peter Rance,
5 days ago
Verified
Very good service
Very good service, very good product.
customer,
5 days ago
Verified
Excellent Service
Excellent Service
Recommend...they did exactly as I requested
david,
6 days ago
Verified
Super products cut perfectly to…
Super products cut perfectly to dimensions. Delivery got delayed but not Cut My fault.
Would recommend their products
Lee Hudson,
6 days ago
Verified
Clean cut.top
Clean cut.top . very well packed fast delivery
Steve Tyson,
6 days ago
Verified
Excellent service excellent product
Excellent service excellent product
Mr Jackson,
6 days ago
Verified
Excellent for portable air…
Excellent for portable air conditioners, reasonable delivery time and good quality velcro fittings.
When in situ it is almost invisible. Love the way you can see the result virtually. It really helped me visualise where to put the hole so that the handle can turn and open through it, as well as position the exhaust duct outside. Plan on a repeat order for the bedroom.
Emm,
6 days ago
Verified
Cut to size I needed
Cut to size I needed, posted with care
DAVE NIGHTINGALE,
6 days ago
Verified
Small job done well
It was a small job for you, but it was done perfectly and delivered promptly, if a day later than the estimate.
Mark Niles,
6 days ago
Verified
Very pleased
I am very impressed with this company I ordered a non-standard sized cupboard door. It was cut to size and delivered in only a few days. Really user friendly to input the requirements and prompts appear on the website for hinge placements and other cut out options.
Nick,
6 days ago
Verified
Fast service
As usual a easy process of ordering. And very quick delivery.
Great service
darren,
6 days ago
Verified
Good!
Easy to order, sheets were exactly the right size and finished as expected, well packaged and arrived quickly. Recommended.
Fraser Girvan,
6 days ago
Verified
Very efficient service
Very efficient service, arrived sooner than expected, well wrapped and good quality product
Kreisha,
6 days ago
Verified
Very satisfied
Good quality plywood, well cut as I needed some cut-outs and I couldn't have done them as well myself. I have used them twice and very happy with their work.
Ian Perrott,
6 days ago
Verified
great prices bit expensive on delivery cost
quality great prices great delivery though bit expensive and delivery firm not that good took time to deliver and then didnt look at delivery instructions !
PaulandMo Smith,
1 week ago
Verified
they were very helpful and efficient.I…
they were very helpful and efficient.I received the goods as ordered
customer,
1 week ago
Subscribe to our email newsletter
Sign up here for our occasional email newsletter with new products, design ideas and discounts across our huge and growing range of products. (You can unsubscribe at any time of course.)